This is a very brief introduction to the concepts and principles behind the microscopy that you can do in LMCF. The facility has a broad range of imaging equipment and this overview covers most of the imaging systems and techniques available. There are links throughout for more detailed information.
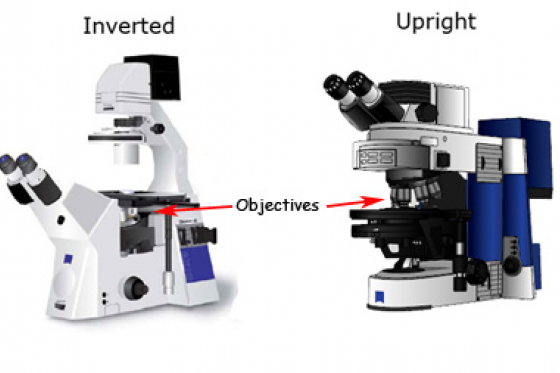
It is worth pointing out that most types of microscopes are available in two orientations: upright and inverted. Other than the orientation of the components, the principles are the same.
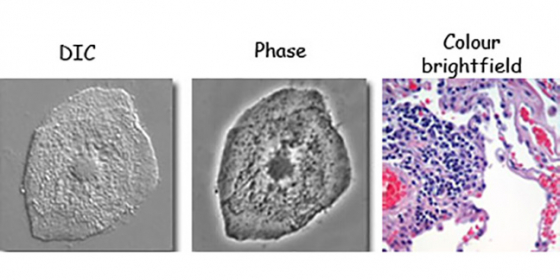
You've probably done this type of microscopy looking at tissue culture cells. In brightfield, light passes through the specimen, some is absorbed/scattered and an image is formed from what passes through.
Contrast is improved with techniques such as phase contrast or DIC. Tissue samples can be stained with dyes (eg H&E) or with immuno-histochemistry and colour images can be captured on either the Axio Imager or the stereoscope.
Fluorescence is very useful for staining specific molecules within your sample and is the basis of much of what is done in the facility. The core principle of fluorescence is that the fluorophore is excited with one wavelength of light and light of a different wavelength is emitted. Common fluorophores are chemical fluorophores bound to an antibody, or fluorescent proteins. By forming an image from the fluorescence emission you learn where your protein of interest is located.
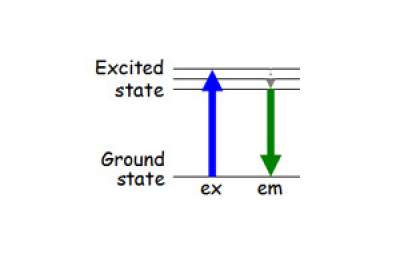
Here is what happens with a green fluorophore:
The fluorophore absorbs a blue excitation photon and an electron changes from the ground state to an excited state.
The electron then decays back from the excited state to the ground state and releases a green photon. The emission photon is always of lower energy (longer wavelength) than the excitation photon because some energy is lost in the process.
Every fluorophore has characteristic wavelengths for excitation and emission and it often useful to view these on a graph like this.
This show a green and red fluorophore, because the spectra are relatively well separated it is possible to image both colours in one sample.
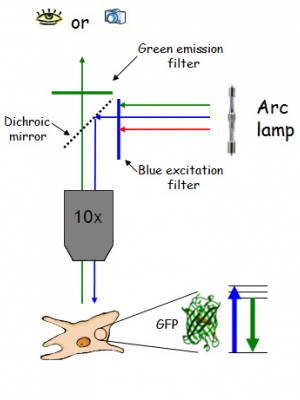
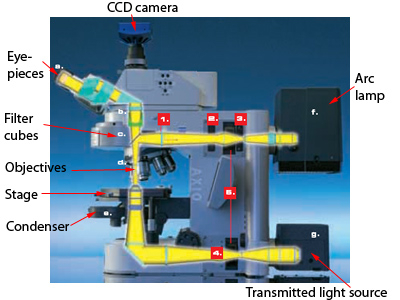
Fluorescence microscopes produce widefield images. This is the basis of what happens in a fluorescence microscope:
- The fluorescence source (from the arc lamp) produces bright white light which is passed through a coloured filter to produce the specific excitation light, in this case blue for GFP
- This is reflected by the dichroic mirror, goes through the objective and to the sample
- The sample (hopefully!) fluoresces as described above and some of the emission light goes back through the objective
- This is the important bit: the dichroic mirror transmits the longer wavelength light so the very bright excitation and the relatively weak fluorescence are separated.
- The emission is normally passed through another filter and then can be either seen with the naked eye or captured with a camera
This is what an upright fluorescence scope typically looks like. Notice the fluorescence light path is only above the stage (this is called epi-illumination and the objective is both the condenser and the imaging lens). The transmitted light path features a condenser on one side of the sample and the objective on the other.
Stereoscopes are a subset of macroscopes (ie scopes for looking at quite big things). Perhaps we shouldn't have one in the microscopy facility then? The "stereo" bit refers to the fact that your left and right eyes get a slightly different view and things look 3D. Our stereoscope has two cameras and imaging modes:
- A fluorescence camera (sensitive and black and white) - the system can produce green or red fluorescence images and the principles are the same as the fluorescence system above
- A colour camera for taking pictures of transmitted or reflected light images. Both of these types of images involve illumination with white light, transmitted goes through the sample, reflected light is shone from an angle. You can even do a mixture of both.
The stereoscope can produce total magnification of between 12x and 150x (so the maximum magnification is equivalent to a 15x objective on a fluorescence scope).
Confocals produce an image in quite a different way from wide-field fluorescence scopes. Rather than exciting the entire field at once, the light is focused into a very small spot and this is scanned across the sample and an image is built up. This may sound like quite a strange way of making an image, what is the point?
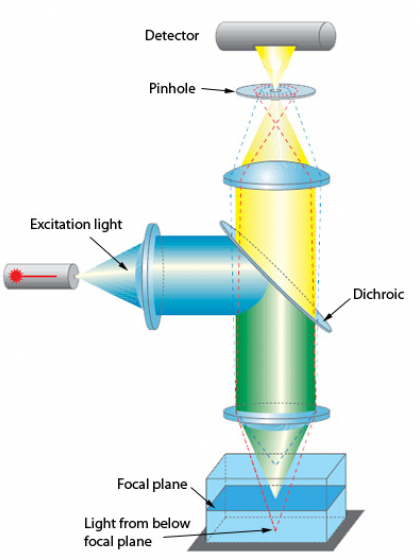
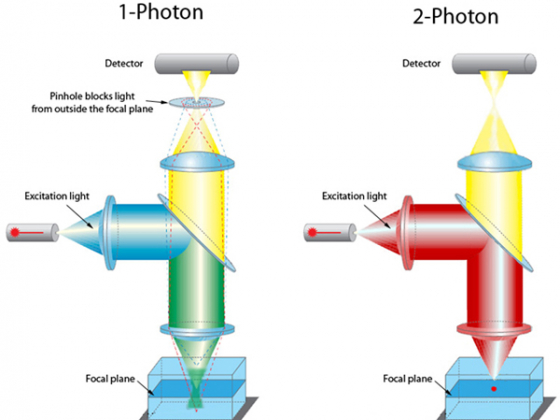
The key part of the confocal is the pinhole. Notice that only the light from the focal plane passes through the pinhole to the detector. The light from just below the focal plane (follow the dotted red lines) is mainly blocked. Same for the light from just above (follow the blue dotted lines).
By blocking the light from outside the focal plane confocals have good z-axis resolution and are great for imaging thick samples because the haze from out of focus objects is mostly eliminated.
Confocal microscopes are much more complex than widefield systems. They consist of a normal microscope with the confocal bit stuck on the side. This shows the basics of a system: Lasers are used for excitation. The laser beam comes into the system, and is reflected by the dichroic. Next, two scanning mirrors move the beam in a raster (like writing on a page) across the sample. The fluorescence light than passes back through the objective and is descanned (ie reflects off both scanning mirrors). The light then passes through the dichroic and pinhole to the PMT (photomultiplier tube) detector. There are really lots more lens and mirrors involved and our systems all have 3 PMT for 3 different colours.
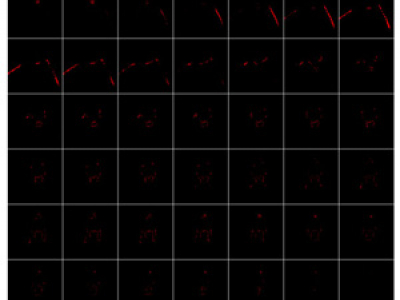
The improved resolution in the z-axis makes 3D imaging with confocals very successful. The basis of 3D imaging is to take several images at different positions along the z-axis. . .
There are lots of things to adjust to get a good confocal image . . .
These might make more sense when you have used a confocal a little bit, but hopefully this explains some of the principles -
Laser power
The power of each laser line can be controlled using AOTFs (acousto-optical tunable filters). These let through between 0 and 100% of the light from a particular laser line. Rather than changing how much light the lasers produce (many are either on or off), it is faster and gives finer control to adjust how much is let through the AOTF to the sample.
Focus
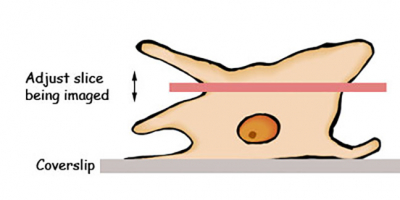
Because a confocal microscope is imaging only a thin slice through your sample, it is important to be imaging the correct thin slice.
(Focus is actually the wrong word to use here as the confocal is always technically in focus. It is a fine adjustment in the z-axis that is required).
Zoom (optional)
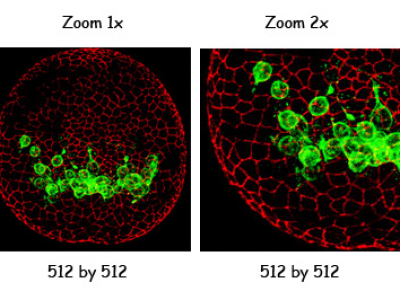
You can make the scanning mirrors sweep a smaller area giving you a zoomed-in image with the same number of pixels.
In many situations it is true zoom, but only to a point. It is better to use the 100x objective than to zoom in 10x with the 10x objective.
Pinhole
This effects the brightness (ie amount of light you collect), slice thickness and resolution. A bigger pinhole increases brightness but reduces resolution.
What is best? Try and use Airy Unit 1 if you can, if your sample isn't bright you will probably be better off with a slightly larger pinhole.
Gain and offset
These effect the sensitivity and background level of the detectors (the PMTs).
Increasing the gain makes the PMT more sensitive and so your sample look brighter. Reducing the offset reduces the background level.
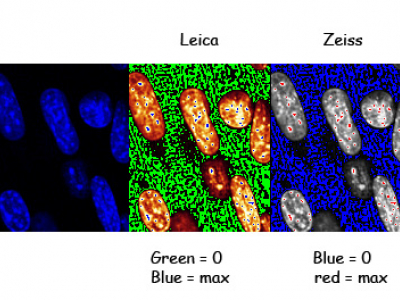
Confocals usually have a special display mode (lookup table) that helps you set these. Adjust the gain so just a few pixels are the max colour, reduce the offset so the background is about 50% the 0 colour. This ensures you have the full range of brightness within your image.
Averaging
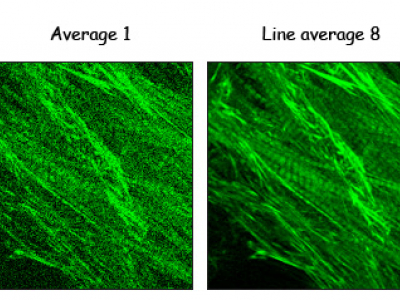
Confocal images are often somewhat noisy and averaging helps to reduce the noise. Line averaging of 4 means each line is scanned 4 times and the 4 scans of each pixel are averaged.
Try and few values and see what the minimum that gives you a good image. Line averaging somewhere between 2 and 8 are the most common choices.
Number of pixels
The same area can be scanned with a different number of lines and pixels.
512 by 512 is a common starting point. This means the image is made up of 512 lines and each line consists of 512 pixels.
Isn't more better? Sometimes. At some point the number of pixels saturates the resolution of the system, and of course it is slower and makes the files larger.
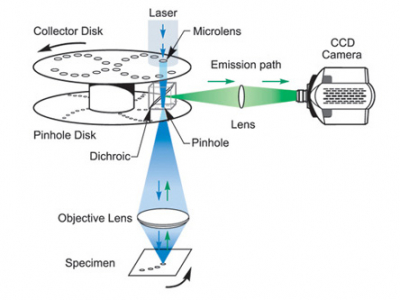
Spinning disk confocals are sort of half way between a wide-field fluorescence scope and a scanning confocal. The confocal principle is the same: a spot of light is scanned across the sample and a pinhole blocks the out of focus light. The main differences from a point-scanning confocal are:
- In a spinning disk there are many spots of light
- The spots are "moved" by means of a rotating disk with holes rather than scanning mirrors
- The light is collected on a CCD camera rather than PMT
- The entire image is collected at the same time (faster)
Again the excitation is produced by a laser. This is defocused onto the disks, the first disc consists of many collector lenses which focus the light onto the pinhole disk below. This disk rotates very rapidly so the many spots are scanned across the sample.
The emission light is descanned through the pinhole (the speed of the disk is insignificant compared to the speed of light) and just like a regular fluorescence scope it is separated from the excitation light by a dichroic and goes to a CCD camera.
Spinning disks are very good for living samples because they are fast and have relatively low phototoxicity. For fixed samples, you are probably better off with a point-scanning confocal.
Two photon excitation can have advantages for imaging thicker samples. Rather than exciting the fluorophore with one photon, the excitation is produced by two lower energy photons. Only in a specific region is the excitation light focused with sufficient intensity to cause fluorescence.
Two photon excitation has a number of advantages:
- The longer wavelength excitation penetrates further into the sample
- Sometimes this means of excitation is less damaging
- Photobleaching or uncaging is possible with fine z-axis resolution
- Some fluorophores are only efficiently excited with 2 photon
A two photon excitation microscope doesn't need to use a pinhole. Because the sample is only excited in a very specific plane we know where the light has come from so all the light can be imaged and excellent z-axis resolution still be obtained.
The other big difference between our 2 photon and single photon systems is the laser used: 2 photon excitation requires a pulsed laser to enable excitation via the two step process (the half-way state is very short lived so the second photon needs to act very soon after the first). We have a femtosecond pulsed laser for doing this, and it cost a frightening amount of money.
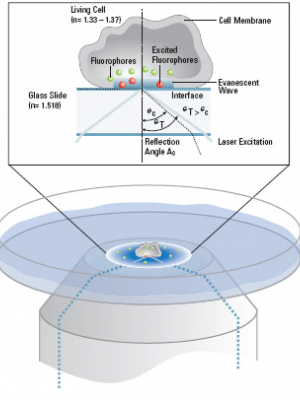
Total internal reflection fluorescence is a technique where only a very thin section close to the coverslip is excited. This makes it great for studying events in the cell membrane. The technique relies on refraction between the coverslip and the aqueous sample so only really works with living samples. The LMCF TIRF system has an incubator to keep the cells happy.
This diagram from the Leica brochure nicely explains TIRF. The excitation from a laser is sent off-center up a high-NA objective. The light hits the coverslip at an angle such that total internal reflection occurs and light passes through the coverslip and generates an evanescent wave. This layer of excitation might be only 100 nm thick, much less than the z-axis resolution of a confocal.
Aside from the special mode of excitation, the rest of the imaging is the same as a normal fluorescence microscope.
Here are some examples of differences between imaging in widefield and TIRF.
We haves some general advice about immunofluorescence sample preparation here.
If you are making slides, using the correct coverslip is very important. Number 1.5 coverslips are optimal for most objectives. Using the wrong ones can make the images very dim and imperfect, and may even make the slides unimagable.
If you are using live cells, glass bottom dishes work well. Again the ones with number 1.5 coverslips are generally optimal and the catalog number is P35G-1.5-14-C.
There are many secondary antibodies to choose from, Alexa488 and Alexa568 are very good green and red ones and they will work with most microscopes in the facility.
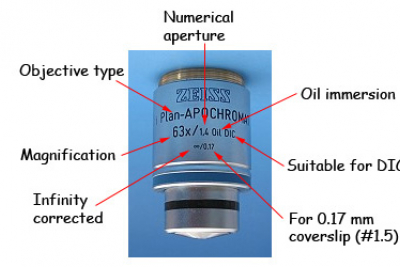
Whichever type of microscope you will be using, choosing the right objective is very important. The magnification required is a big factor in the choice. The numerical aperture of the objective is also very important. High NA gives higher resolution and brightness, makes the depth of field smaller and generally makes the working distance less. Low NA objectives are dry, higher NA objective require some sort of immersion (eg water or oil). Matching the refractive index of the sample and objective immersant is generally a good idea (ie oil for fixed samples, water for thick living samples). Objectives have quite a lot of information written on them:
These are rather important and saving your images in the correct format is a good idea. It may help if you consider these facts:
Images are made of pixels, and each pixel has a certain brightness.
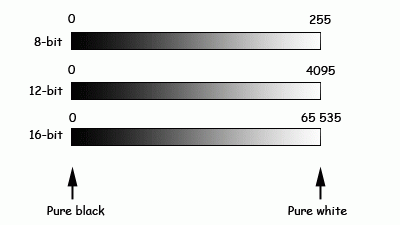
The range of brightness (number of greylevels) within an image varies with microscope and file format. Here the same range of brightness can be quantified in either 8-bit, 12-bit or 16-bit. Same range, different numbers of greylevels between pure black and pure white.
(8-bit, 12-bit or 16-bit images actually look the same on a computer screen as they are generally on capable of displaying 256 greylevels for each colour).
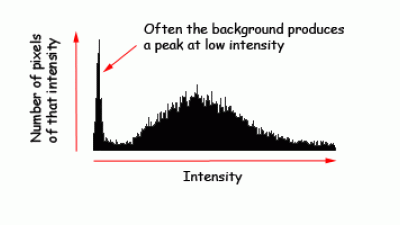
It is often useful to consider the range of intensity values within your image. The image histogram is graph of this information.
The range of intensities (ie number of gray levels) in an image is important. Generally, the more greylevels the better.
You will get much better contrast in the displayed image if the black to white range is matched to the range of intensities within the image.
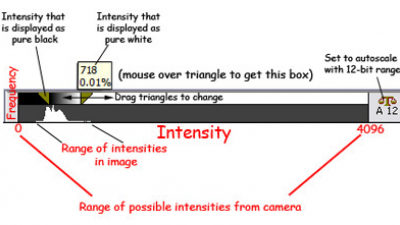
Here is the histogram and image scaling from MetaMorph (you might have done this with "levels" in photoshop).
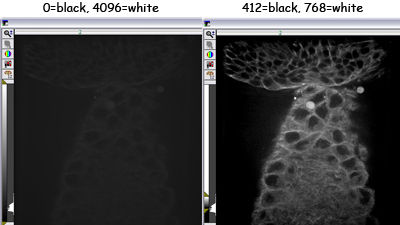
These are the same image displayed with different scalings. The image only has a fraction of the total dynamic range of the camera -
The one on the left is set to display the entire range of intensities (even though the brightest pixel in the image has an intensity of 819)
The image on the right is displayed so the black-to-white scaling of the display better matches the range of intensities in the image.
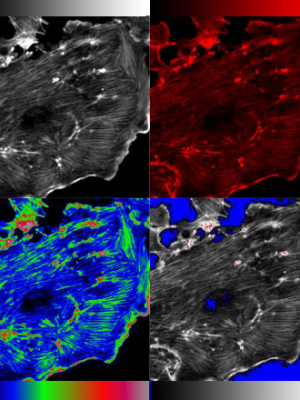
The same image can be displayed with different lookup tables.
- Black to white
- Black to red
- Rainbow
- Under/over (blue=0, red=saturated)
This is a mathematical processing of images to reduce the blur from out of focus light. This increases the signal:noise ratio of the image. There are two main types of deconvolution:
Deblurring/nearest neighbor uses a mathematical process to estimate the blur from other focal planes and remove it. This sharpens the image but is non-quantitative.
Restoration is more computational intensive and works best with 3D data sets. The software uses an iterative mathematical process to reassign the photons.
Before (left) and after (right) deconvolution.
The images is from the Huygens website. Huygens deconvolution software is available in on the FFSC analysis workstation.
There is an enormous amount of image analysis that can be done and we have various programs for doing so.
Examples of analysis:
- Measuring the intensity of various regions within your images
- Measuring the area of objects
- Counting the number of objects
- Tracking the position of an object over time
Frequently Asked Questions
Which microscope has the best resolution?
Resolution is a term that is often misused. Resolution means the smallest distance between two objects that can be seen (resolved) as two objects not one. Confocals have slightly better resolution than widefield systems but resolution is not usually the most important factor. Choosing the right microscope for your particular sample and aim is important and different modalities and systems have different optimal capabilities.
How much does a microscope cost?
A lot. A good fluorescence scope system might be about $100k, a confocal more like $400k. It's worth remembering a confocal costs more than one of these, so please try not to break them. Objectives range from $1000 to $14,000, (cf one of these), so try not to break those either.
