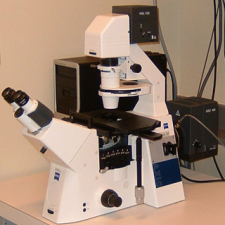
Capabilities:
- Multi-channel fluorescence imaging - DAPI, CFP, green, YFP, red and far-red
- Phase contrast and DIC optics
- Ideal for thin fixed specimens (oil objectives)
- Multi-well plate holder for TC cell documentation
- Mercury lamp
- Power strip on shelf
- Hamamatsu Orca-R2 controller
- Computer
The Mercury lamp should always be first-on and last-off. This prevents any electrical surges caused by ignition damaging other equipment on the same circuit.
Then log-in to the local user account, double-click the MetaMorph icon on the desktop to open the program.

- Binocular eye pieces - adjust the inter-ocular distance
- Wheel on the leftside of the scope controlling the light path - Either to camera (arrow), eyepiece (circle) or 50/50
- Stage - control xy position manually using hanging drive
- Focus knobs - outer part is coarse; inner is fine focus
Objectives
|
Mag
|
NA
|
Oil?
|
DIC/phase
|
|
5x
|
0.16
|
NO
|
Phase1
|
|
10x
|
0.30
|
NO
|
Phase1
|
|
20x
|
0.50
|
NO
|
Phase2
|
|
40x
|
0.75
|
NO
|
Phase2
|
|
63x
|
1.40
|
Yes
|
DIC III
|
|
100x
|
1.40
|
Yes
|
Phase 3
|
Condenser
The condenser is above the stage and is only used for transmitted light imaging -
- The DIC analyzer is in filter cube position 1
- Cube 1 (DIC analyzer) is the best choice for transmitted images (DIC, phase or brighfield)
- Press the TL button on the scope to turn on the light, adjust brightness.
Kohler illumination
If you want to accurately observe or capture transmitted light images, you will need to establish Kohler illumination each time you change objective. This ensures the illumination is even and is essential for optimal image quality.
- Focus on your specimen using transmitted light
- Close down the field aperture until it occupies about 2/3 of the field of view.
- Focus the condenser with the knobs underneath the stage that raise/lower entire condenser. Then center the field of view using the centering pins also located underneath the stage. Finally, open the field aperture until it is out of view.
- Remove eyepiece and close condenser aperture until 2/3 of field is illuminated (or you can adjust this while looking at your sample until the image has the best contrast)
The reflector turret contains these filter cubes:
- For transmitted images
- DAPI
- Cy5
- GFP
- YFP
- Red
A far-red cube is available.
- Choose the cube you want
- Make sure the TL is off
- Choose "Fluorescence" from the MetaMorph illumination menu
- Click the toggle shutter icon to the right of the menu to open/close the shutter
- The brightness can be adjusted with the 6-position fluorescence attenuator
When you have located and focused on your specimen, rotate the wheel to send light to the camera. Remember that the field of view of the camera is a smaller than the field of view down the eye pieces so make sure your sample is centered.
Open the acquire dialog box
This can be opened from the task bar Acquire or from the dropdown menu, Acquire> Acquire

Things to set in the Acquire window:
- Set the display to "Autoscale" - the triangles on the image histogram show the scale min and max.
- The image gamma - the relationship between measured and displayed brightness. 1=linear
- Exposure Time - Type in value, mouse-over image to give pixel intensity values (between 0 and 4095) for both structure and background
- Full chip uses entire CCD camera, sub-arrays produce smaller files and may be faster
- Binning - combines CCD pixels to form n x n super pixels - increases sensitivity but reduces resolution
- Press 'Show Live' to see the specimen through the camera - it may be necessary to focus or move the stage slightly
- Clicking the folder icon allows you to set whether each image starts in a new window or overwrites the previous image (handy for optimizing your image, be careful not to lose your data though)
- External shutter linked to camera should be [Current Shutter]
- Gain and offset for the camera under the Special tab - Start as 0 and 255 respectively
Press the 'Acquire' button to capture the image
Saving images
Simply click save and name your file. Images will be saved as 12-bit TIFF images with all the original data. Not all programs will open these images but you are recommended to save the original images.
To save your individual images as 8-bit files (compatible with all programs but some information is lost)
- Press Copy to 8-bit button on the task bar
- Select the desired image from the "Image:" drop-down menu
- Press Copy and Save by going to File >Save as (make sure the file name is different otherwise you will overwrite the original)
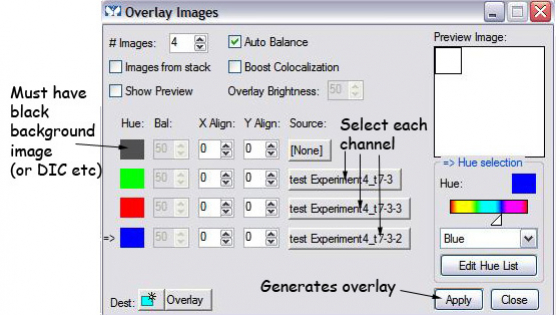
If you have more than one colour, you can make an overlay of the images. Click "overlay images" on the task bar and follow the dialog box. The result is 24 bit RGB image compatible with all programs.
If there is somebody booked after you within 1 hour of finishing, logoff the computer
If nobody is scheduled to use the instrument within 1 hour of finishing, please shut it down:
- Clean any oil objective(s) using lens tissue
- Close MetaMorph
- Record your use of the system using the CoreResearch booking system
- Computer
- Hamamatsu Orca-R2 controller
- Powerstrip
- Mercury lamp (Remember: First-on, last-off)
- If you are the last user of the day, please cover the microscope making sure the cover doesn't touch the hot mercury lamp housing