Here is an overview of immunofluorescence (IF) protocols. Unfortunately, there isn't one protocol that is best for everything, so some testing and optimization is often necessary. If you can find out conditions that work well for your antibody-protein-specimen (eg from papers, companies selling the antibodies, lab web pages) that can save some time.
Whatever you want to image needs to end up in a suitable configuration for the microscope. Slides and coverslips are the easiest thing to use for most fixed samples. (Obviously living samples are completely different and here are some suggestions for live cell imaging).
Tissue culture cells can be grown directly on coverslips. In general you should use #1.5 coverslips as most microscope objectives are designed to work optimally with these. Round 18 mm coverslips in a 12 well plate work well, or 12 mm coverslips in a 24-well plate, or 22 mm square coverslips in a 6-well plate. (Tweezers with a fine tip are good for handling the coverslips). Coverslips can be cleaned before use. Some Multiwell slides can have problems so in general we don't recomend these.
You might want to sterilize the coverslips (eg washing in ethanol or exposing to UV in the plate for 30 min). Many cells will grow hapily on uncoated glass but some do better with coverslips coated (eg 50 µg/ml poly-lysine for 1 hr, or collagen). Transfer your cells into the plates and culture them (eg overnight) so they are well adhered and so they are 40-70% confluent when they are ready for fixation. Do what ever you want to the cells - transfect them, stimulate them, inhibit them, inhibit them then stimulate them. Rinse them a couple of times with PBS, and then they are ready for fixation.
Suspension cells can be attached to slides via Cytospin - A low-speed centrifuge that can deposit a uniform monolayer of cells onto an area of a glass slide while maintaining cell morphology (but somewhat flattens them).
Tissue sections should be <100 µm thick for confocal microscopy.
Live Cell Imaging
LMCF has several systems for imaging living mammalian cells at 37C. Samples are best grown in these glass bottom dishes (make sure you get the ones with number 1.5 coverslips). These dishes are good for your cells, fit optimally with the incubators and provide very good focus stability.
Live cell imaging is a balance between getting the information you need and keeping your cells healthy. In general, you will probably have to sacrifice some image quality to minimize photobleaching and phototoxicity. It is important to use as little excitation as possible.
Some very useful information is available here: http://micro.magnet.fsu.edu/primer/techniques/livecellimaging/index.html
The goal of fixation is to maintain cellular structure as close as possible to the native state. Once fixed, you can go through the rest of the protocol without losing the protein of interest and, indeed, the rest of the cell. There are various fixation methods suitable for IF. Fixation can damage or mask antigenic sites, thereby compromising the intensity of your immunostaining. You may find the need to test several fixatives before you find the one that produces the right balance of antibody binding and structural integrity of the sample.
Formaldehyde/paraformaldehyde
Aldehyde fixatives cross-link proteins and generally preserve well the cell morphology. They are somewhat slower acting than organic solvents, especially for thick specimens. 4% formaldehyde for 10 min is a good starting point for mammalian cells.
Some samples are prone to fixative-induced autofluorescence and this can be counteracted with reduction of the aldehyde groups with BH4 or NH3Cl at 10 mM is more gentle reagent good for cells.
What are paraformaldehyde, formaldehyde, formalin?
Glutaraldehyde preserves the cellular structure very well but causes strong autofluorescence and so is used mainly for EM.
Methanol
Organic solvents like methanol precipitate proteins, which produces a similar outcome to crosslinking with aldehydes - the protein "shell" of the cell is maintained, but all the small molecules within will be lost during the rest of the protocol. Fixation with methanol denatures proteins, so never use if you have a fluorescent protein that you want to look at in your sample. Some antigenic epitopes are in fact completely destroyed by methanol. However, it might also be advantageous for some other antibodies (especially some monoclonal antibodies which bind only one epitope) that the naturally buried antigens could be exposed after methanol fixation.
Methanol/Acetone Using a combination of methanol and acetone can improve immunolabelling lost in 100% methanol fixation (methanol is best for structure, acetone permeabilizes well and is less damaging). Try 10 min in solvent at -20°C as a starting point.
Both paraformaldehyde and methanol
What if you double-label your sample using one antibody that is compatible only with paraformaldehyde and the other one with methanol? Try fixing the sample first with paraformaldehyde for 10 min at room temperature and then 5-10 min with -20 °C methanol (or methanol/acetone).
Microwave fixation
Microwave fixation is useful for penetrating thick tissue samples, often in conjunction with chemical fixatives such as the above.
Permeabilization helps get the antibodies into your now-fixed cells. A range of different detergents can be used, including NP-40, Triton X-100, Tween-20 and Saponin. Other solvents (eg ethanol or DMSO) can also be used to remove lipid. The fixation step actually permeabilizes the cells to some degree (ie they remove some of the membranes), so these steps aren't really completely distinct (eg Acetone permeabilizes as well as fixes).
The extent of permiabilization required depends on what you are trying to look at. For example, cell surface proteins don't require much/any permeabilization, indeed, if you remove all the membrane you will lose your protein. Labeling before permeabilization can also help distinguish extracellular subjects (eg cell surface-bound bacteria) and that within the cells (which only stains after permeabilization).
Fixing and permeabilizing your cells affects the cell morphology and the availability of the antigen you are trying to detect. You may get different results with different reagents, times and concentrations hence the need for protocol optimization. The distortion of the cell morphology is something to bear in mind when interpreting the images.
How to actually do these steps
If you use glass coverslips-in-plate format, both fixation and permeabilization steps can be carried out in the plate. The reagents are cheap so it's no problem to immerse the coverslips. Washings can also be done easily in the plates.
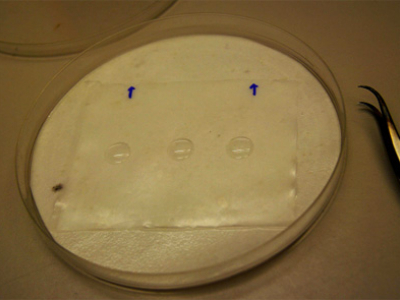
Antibody incubations require a small volume. A good way of doing this is to make a humidified chamber to hold the coverslips and then pipette a small volume of solution onto each coverslip. A simple chamber can be made from a 15 cm petri dish with water-soaked filter papers covered by a layer of parafilm. Use your tweezers to move the coverslips, careful to keep them cell-side up!
The most important part of the process - if it is good, you will get a bright, specific staining. The perfect primary antibody has good affinity (ie it binds strongly to your protein of interest) and good specificity (ie it doesn't bind to much else). It's worth finding and paying for the best antibody available you will not only become a proud creator of brilliant and trustworthy images, but also in the long run save you and your lab a lot of time and money.
The concentrations of the antigen are much lower in IF than on an immunoblot, so the antibody concentrations used are generally higher. Once again, you will probably need to try a range of dilutions unless you have a protocol that you know works well. The best dilution for an antibody ranges from 1:10 to 1:10 000 dependent on the abundance of the antigen, purity of your antibody, affinity between the antigen and the antibody, etc. Dilute your antibody in the blocking solution.
Double/triple staining The primary antibodies can be mixed as long as they came from different species of animals (most often mouse and rabbit) before being applied to the coverslip. For a 12 mm coverslip, 20 µl of antibody is more than enough. Add the antibody from one end of the coverslip as you do for blocking to avoid scratching of the cells. Antigen-antibody interaction will mostly accomplish in an hour at room temperature, or overnight at 4 °C (you can use more antibody solution to compensate for the evaporation).
Wash the sample several times with PBS+0.05%Tween after antibody incubation to reduce the background. Basically, you suck out the antibody solution from one side of the coverslip, adding washing solution from another side, letting the washing solution to spread itself. Let the washing solution stay with the sample on bench for 5 min. Repeat 3 more times. By this way, the washing is pretty complete, although some people prefer to put the coverslip back to the plate and to wash with rotation. Squirting the slides with a wash bottle is fast and effective.
The Alexa Fluor secondary antibody conjugates are excellent - bright and stable fluorophores and cross-adsorbed for good species specificity. Other fluorophore conjugates available from Jackson ImmunoResearch and Rockland are also good and reliable. Use the most extensively cross-reaction minimized products. Although the price might be higher, but they are still cheap compared to the primary antibodies and other lab materials, and a tube of secondary antibody may last a year
Dilute the fluorophore-conjugated secondary antibody in PBS-0.05% Tween 20 (again you can include 5% goat serum if the secondary antibodies are from goat). Most secondary antibodies can be used after 1:200-1:500 dilution, for 1 hour at room temperature or overnight at 4 °C. You can add the solution and incubate in the same way as the primary.
Which ones to choose for multiple labelling? Most of the LMCF microscopes are quite versatile and can image a range of fluorophores. Here are some typical fluorophores to use (you can use the fluophore spectra links on the reference page and the information on the relevant microscope page to work out other combinations)
|
Blue
|
Green
|
Red
|
Far-red
|
|
DAPI
|
AlexaFluor 488
|
AlexaFluor 568
|
AlexaFluor 633 or 647
|
|
AF405 (confocals), AF350 (fluorescence scopes)
|
GFP, Cy2
|
Cy3, Rhodamine RX, Texas Red
|
Cy5
|
An alternative to secondary antibodies is direct labeling of your primary antibody with a fluorophore (eg with kits from Molecular Probes) but this aproach is only used in special cases.
More washing (say 4 or 5 times) in PBS-T to remove non-bound secondary antibody then . . .
Mounting medium helps preserve your sample and raises the refractive index to give good performance with oil objectives. Mountants often have scavengers which soak-up free radicals and reduce photobleaching (these sometimes reduce the initial brightness of your samples). Prolong Gold from Molecular Probes and Fluoromount-G (anti-fade) from Southern Biotech are good examples of a bunch of similar products bearing different trade names. Rinse briefly the coverslip by dipping it in distilled water a couple of times to wash out the salt. Otherwise the coverslip will show salt stain when the salt is dried. Just put a spot on your sample before putting the coverslip (#1.5) on the slide, and let them dry lying flat before imaging. Seal the slides after letting them dry if you aren't going to image them immediately.
IF requires careful interpretation. There might be autofluorescence, non-specific binding of the secondary antibody, and the primary antibody might not bind only to the protein you think it does. Controls to convince you of the specificity are important (eg secondary only, blocking primary antibody with the protein/peptide against which it is raised, lack of signal in knockout/RNAi cells). Lastly, because your IF results will be of only a few cells it is important to show ones that are typical and representative.
Download PDF of Protocol (pdf - 49.27 KB)
More Details
This is just an introduction to sample preparation. Please contact us if you would like to discuss the design of your experiments.