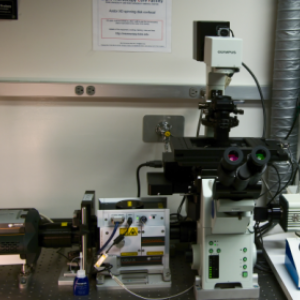
Capabilities:
- High-speed multidimensional imaging with optical sectioning
- Spinning disk modality produces high SNR images with minimal photobleaching
- High sensitivity EMCCD camera
- Laser lines for all classes of fluorescent proteins
- Incubation for mammalian cells
- IR reflection based autofocus
- Silicon oil 60x objective for RI match
Only turn on the things you need.
1. If you will be using fluorescence for eyepiece visualization, turn on the Prior arc lamp, otherwise leave it off.
2. Switch on the power strip. This will turn on the Andor controller and lasers, microscope controller, microscope, camera, the Yokogawa spinnining disk module, ASI stage controller, and the motorized dichroics.
3. If you are going to use the onstage incubator for CO2 supply to live cells, switch on the main power of the Tokai Hit control unit, switch on the CO2 controller, and adjust the concentration of CO2 you wish to use. During imaging, the onstage incubator needs to be top-covered.
4. The onstage incubator has been disabled for heating purpose. If heating is desired, use the external heater and the environmental enclosure instead. The procedure of setting the temperature and humidity inside the enclosure is posted beside the heater.
5. Turn on the computer, log in, and start MetaMorph.
Nearly everything on the microscope is motorized so can be controlled through MetaMorph.
Objectives
|
Mag
|
NA
|
Immersion
|
DIC |
Working Distance
|
|
10x
|
0.3
|
Dry
|
DIC |
10 mm
|
|
20x
|
0.5
|
Dry
|
DIC |
2.1 mm
|
|
40x
|
1.3
|
Oil
|
DIC |
0.2 mm
|
|
60x
|
1.3
|
Silicon Oil
|
DIC |
0.3 mm
|
|
60x
|
1.3
|
Water
|
DIC |
0.28 mm
|
|
100x
|
1.4
|
Oil
|
DIC |
0.13 mm
|
To view your sample down the eyepieces
Pull the laser safety slider to the right . . .
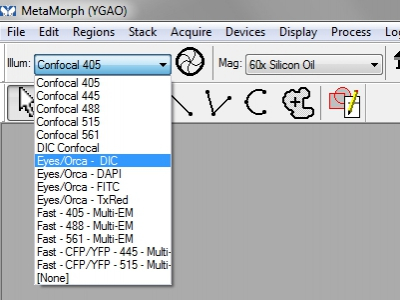
- From 'Illum' at the top left in MetaMorph, select 'Eyes/Orca - DIC' or other fluorescent illumination for 'Eyes'
- Click the shutter icon next to the illumination list to open/close the shutter (always keep exposure to a minimum)
- Brightfield light intensity can be controlled by the 'up' and 'down' buttons on the front of the microscope. Fluorescent light intensity is controlled by the dial on the arc lamp.
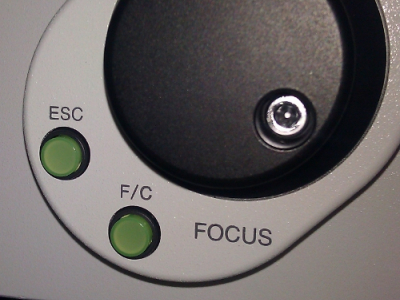
- Focus knobs are on both sides of the microscope. You can choose between fine (F) and coarse (C) focusing by pushing the lower green button. The button labeled with 'ESC' is used to lower down or raise up the objective with one push.
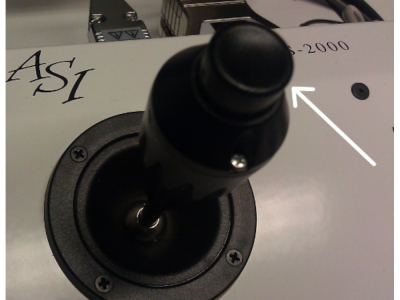
- X-Y stage movement is controlled through the joystick on the ASI controller. Push the button on top of the handle to choose speed for 'fast' or 'slow' movement.
Acquisition through the "Multi Dimensional Acquisition" dialog box
- Slide the laser safety slider to the left. You should feel the click.
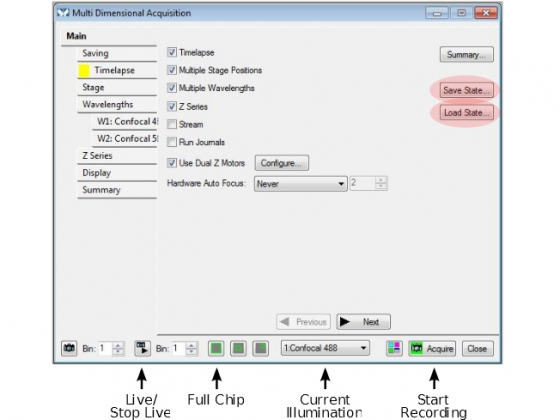
- Open the MDA dialog box and choose functions for Timelapse, Multiple Stage Positions, Multiple Wavelengths, or Z Series for 3D acquisition. Leave the 'Use Dual Z Moters' selected. Hardware auto focus is optional, but recommended (see procedure below).
Main - Select the things you want to do and then go through each tab:
Saving
- Select directory on one of the hard drives for user data. Please backup and remove your data after the experiment in a timely manner. Administrator may delete your data without prior notification.
- Choose a base file name (all the images will be named basename-t1z1 etc.)
- (Optional) Check the increment base file name box if your experiments share the same base name
- Your images are automatically saved along with acquisition.
Timelapse
- Choose number of time points, duration and interval (one will always be a consequence of the other two)
Wavelength
- Illumination - select the illumination you want to use from the dropdown illumination list (e.g. Confocal 405, Confocal 488, DIC confocal, etc.)
- If using EM gain, choose Digitizer of '14-bit (3 MHz, EM Gain)'. Set EM Gain (maximal 300). Be aware, the higher EM gain, the more noise in your images.
- Set exposure time - minimum possible to get a reasonable image
- Press the full chip button before you start to make sure the entire camera chip is used
- Test the settings using the 'Live' and 'Snap' buttons at the bottom of the box (hover the mouse over the icons to find out which is which)
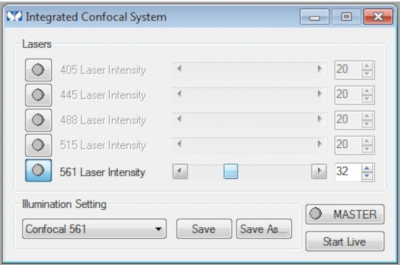
- The laser power has been set for all lasers as default. To change the laser power, click 'Laser Power Control' on the taskbar and open the control box. Adjust the laser power and choose the minimal laser output possible.
- Optimize the acquisition condition for each channel.
Stage
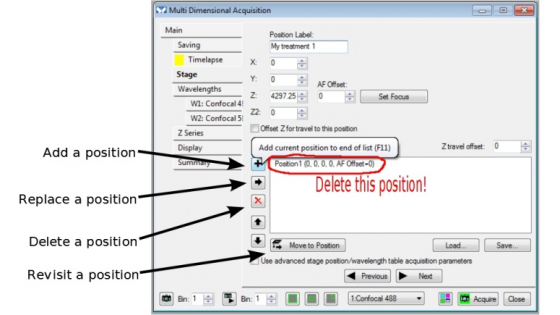
- Multiple positions can be saved in a position list. Please delete positions from the previous experiment.
Set Focus: You are able to do 'Hardware Auto Focus' in time-lapse experiment. For current objectives on the microscope, only 20x (dry), 40x (oil), 60x (silicon oil), and 100x (oil) objectives work.
To do 'Hardware Auto Focus':
- Enable the function in 'Main' page
- locate an imaging position, click 'Set Focus'. The system will set the z position and 'beep' once; if it beeps 3 times, 'Set Focus' fails
- add the position in the stage position list
- repeat steps 2 and 3 for other positions.
Display: Default is okay for most things, for high frame rates they should be minimized to not slow down the computer
Summary: An overview of the settings for your experiment
Settings and configurations can (and should) be saved through 'Save State' function and reloaded ('Load State') in future experiments.
Acquire: To start your multidimensional acquisition.
Modifying settings during acquisition
The most recent image/stack of each channel will be displayed as you acquire the images.
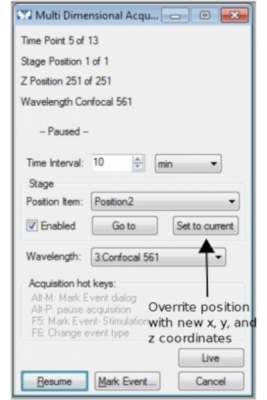
A different acquisition dialogue box shows up, in which information about time points, stage positions and Z positions will be display in real time.
In addition, the acquisition can be paused for user to change time interval, to update stage position ('Set to current'), or to take the chance to apply treatment to the samples. 'Resume' button continues acquisition. To finish the experiment, click 'Cancel' button. It is recommended that you 'Cancel' (a way of stopping the experiment) when the system is idling before the next time point starts. Otherwise the data may be corrupted and not be able to opened. 'Esc' on the keyboard also stops the experiment.
Acquisition through the "Acquire" dialog box
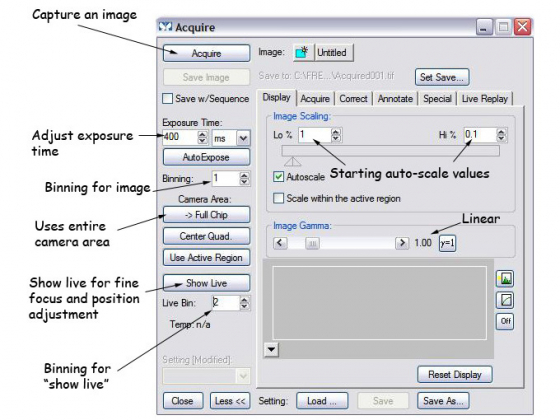
This is for simple imaging of your samples. It can be opened from the task bar 'Acquire' or from the dropdown menu, Acquire> Acquire
- Set the display to "Autoscale" - the triangles on the image histogram show the scale min and max.
- The image gamma - the relationship between measured and displayed brightness. 1=linear
- Exposure Time - Type in value (or choose AutoExpose)
- Full chip uses entire CCD camera, sub-arrays produce smaller files and may be faster
- Select illumination from the 'Illum' list, press 'Show Live' to see the specimen through the camera - it may be necessary to focus or move the stage slightly
- Clicking the folder icon allows you to set whether each image starts in a new window or overwrites the previous image (handy for optimizing your image, be careful not to lose your data though)
- External shutter linked to camera should be [Current Shutter]
Press the 'Acquire' button to capture the image
Saving images
Simply click 'Save' and name your file. Images will be saved as TIFF images with all the original data. Not all programs will open these images. Photoshop will open the files as 16-bit images, you will need to adjust the levels ON A COPY of the file. ImageJ and FIJI can open them also.
(A) The original source images are grey-scale images, although they are displayed in color. To save the images in color, open the 'Overlay Images' functional box from the task bar, add an image (from the 'Image' drop-down menu) to a color channel and click 'Apply', or add images to more than one color channels to generate a merged image.
(B) To save your images as 8-bit grey-scale files (compatible with all programs)
- Press 'Copy to 8-bit Image' button on the task bar
- Select the desired image from the 'Image:' drop-down menu
- Press Copy and Save by going to File >Save as (make sure the file name is different otherwise you will overwrite the original)
Pseudocolored and 8-bit converted images should not be used for fluorescent intensity-based analysis and quantification.
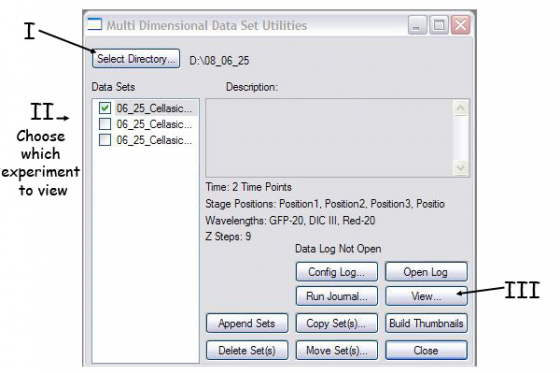
(A) Tell Metamorph which images you want to build. Press 'Review Multi Dimensional Data' window which gives you this box -
- Select directory where your data are stored - point to your folder with the images
- Select data set - choose the individual experiment you want to look at
- Press 'View'
(B) Select the wavelengths, stage positions, Z-slices and timepoints you want to view.
- Select the stage position (one at a time here) and channels you want (probably all of them)
- Right click in the boxes selects that image. Right click on the row/column heading selects the entire row/column
- You can choose multi-colour overlay (under display), projection, or best focus if wanted.
- Use the play and reverse arrows to view the timecouse etc.
- Load Images loads the select images to a single file which can be saved as one or exported to avi or quicktime (Stack/Make Movie from the top menu).
Time and scale stamps
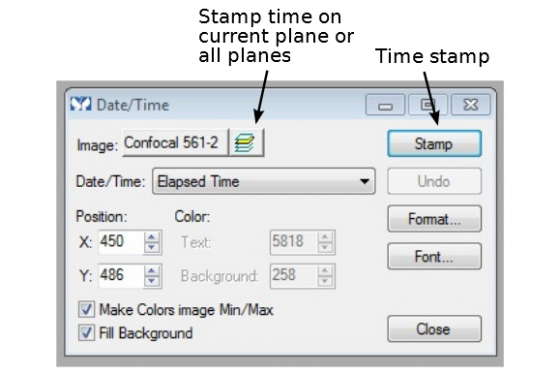
(A) Most of the time, a time stamp is required in a timelapse movie. Under 'Display' tab, find 'Graphics' --> 'Date/Time'. For most time-lapse experiment, 'Elapsed time' is used. The time format can be set to days, hours, minutes, seconds, milliseconds, or in combination. 'Stamp' the time on the current image or all images if 'all planes' is selected.
(B) The Scale stamp is also found in 'Display --> Graphics'. Stamp a scale bar on the image(s) similarly to 'Date and Time'.
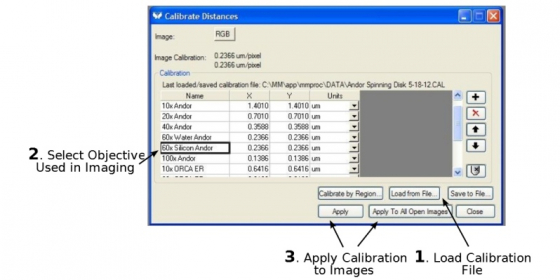
If you work on your images on one of LMCF workstations and want to add a scale bar on the images, you first need to go to 'Measure'-->'Calibrate Distance', and from the dialogue box to 'Load the (calibration) File' for the Andor spinning disk confocal microscope. Click the objective used for imaging and 'Apply' the calibration to the images.
Check the booking calendar when you finish your session. Record your use of the system using the CoreResearch booking system.
If there is somebody using the arc lamp after you in 1 hour: Clean the objective(s) you have used using lens tissue and cotton tipped applicators, lower down the objective, and close Metamorph. If the next user will not use the fluorescence source, the arc lamp can be switched off even if the rest of the system is on.
If there is nobody booking after you within 1 hour: Shutdown the computer and switch off the system.
