Capabilities:
- Widefield imaging of living and fixed samples
- Optimized deconvolution
- Solid-state illumination, fast excitation switching
- Temperature, humidity, CO2 control
- Hardware-based autofocus
- High-precision XYZ stage
- Dual cameras - high-resolution and high-sensitivity
- 405 nm and 488 nm lasers for photoactivation and photo-bleaching experiments
- Optical axis integration/z-sweep acquisition
- Kohler and critical illumination
Power Up
- 1 and 2 - Cameras - Coolsnap power supply behind monitor, Power switch on evolve (need to turn both on to use Evolve)
- 3, 4 and 5 - Switches inside cabinet (laser module needs to be on even if not using them only switch key to on for FRAP/PA/PC)
- Logon to the computer: This is now automatic
If you require temperature control the incubation system is controlled directly by the box above the environmental chamber. It is best to warm the system up for several hours. If you are using mammalian cells the CO2 for the humidified inner chamber can be turned on immediately before transferring the cells to the microscope.
Open the Software and initialize the system
- Double-click the start SoftWoRx icon
- From the File menu chose "Acquire (Resolve 3D"
- Lower the objectives and look to see they are in the lowest position (focus goes the other way to German microscopes)
- Click "initialize" and the system will move the stage to initialize the control of the rest of the system.
- (Troubleshooting: If you have problems with the initialization restart the controller. You can connect to this with the icon on the desktop. Mouse-over the remote desktop and press ctrl-alt-delete to access the shutdown/restart menu.)
Select the desired objective
Manually choose the one best for your sample. Note there are two 60x objectives: The 60 water is good for thicker samples, the 60 oil one is better for thin samples close to the coverslip.
- 10x/0.40 dry
- 20x/0.70 dry DIC
- 40x/0.65-1.35 oil DIC
- 60x/1.42 oil DIC
- 60x/1.20 water DIC
- 100x/1.40 oil DIC
The objectives are not encoded so it is important to tell the software which one you are using so the scaling information is correct. Click the appropriate option in the "Resolve 3D" window.
Select the correct dichroic
The DeltaVision uses fixed manual dichroics/polychroics and you need to choose the right one for your fluorophores. This a wheel underneath the objectives, a small number (that isn't particularly easy to see) at the front indicates which dichroic is in place
- Quad Polychroic (standard quad) DAPI,FITC,TRITC,CY5
- Quad Polychroic (alexaquad) DAPI,FITC,AF594,CY5
- CFP/YFP/Red
- GFP/mCherry
- Dual em pass CFP/YFP for high speed
- Dual em pass GFP/mcherry for high speed
The high speed dichroic (5 and 6) contain dual-band emission filters for use with the solid-state illumination = no moving parts between channel for ultra-fast two channel imaging. The disadvantage is potential for bleedthrough.
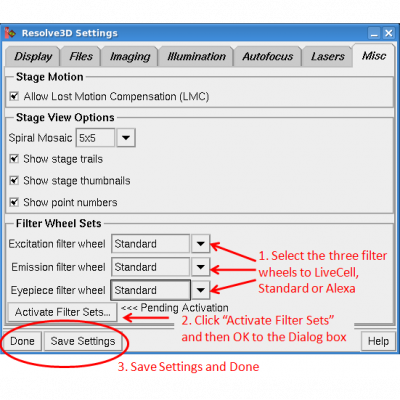
Enable the correct filter set
The system has a variety of filters that cover the use of most fluorophores. Not all the filters can be used at the same time so to make life easier the DeltaVision has them organized as three sets:
Live Cell - ones for fluoroscent proteins - Use Dichroic 3-6 as appropriate
- CFP 470/24
- GFP 525/50
- YFP 559/38
- mCherry 632/60
- POL DIC
Standard - for fixed samples with a TRITC range "near-red" - Use dichroic 1
- DAPI 435/48
- FITC 525/50
- TRITC 594/45
- CY5 676/34
- POL DIC
Alexa set - for fixed samples with a AF594 range "further-red" - Use dichroic 2
- DAPI 435/48
- FITC 525/50
- AF594 632/60
- CY5 676/34
- POL DIC
You choose which one is active by Settings/Misc . . .
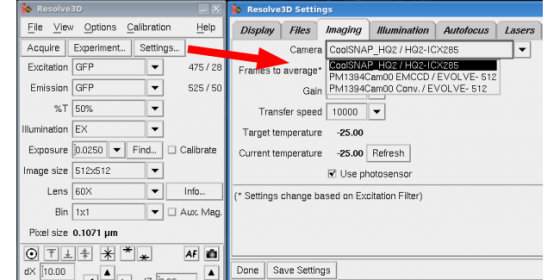
Choose the camera you want to use
- Coolsnap HQ2 high resolution CCD camera - High resolution, smaller pixels
- Evolve back-thinned EM-CCD camera - Fewer larger pixels (so resolution may be reduced) but greater sensitivity
Sam can help you work out which camera is best for your needs if you aren't sure.
Swapping them is easy if the wrong one is in place. Slide out the camera in place (push it in slightly then up and out over the lip) and slide in the other so it clicks in place. Remember to swap the little red lens that keeps out the dust to the camera not in use.
Go to Settings/Imaging mode to tell the DeltaVision which camera to use (you end up with lots of pictures of the back of the microscope or the wall if you don't do this bit). Note the Evolve camera should appear twice - once in EMCCD mode, once in conventional readout mode. Most people will want the EMMCCD mode.
Auxiliary magnification
The microscope has a 1.0x and a 1.6x internal lens. The 1.6x lens will produce more total magnification and a smaller field of view. This can be useful to get a smaller pixels size with the EMCCD camera.
The slider to change between these is on the right side of the scope just underneath the environmental chamber. In = 1.0x, out =1.6x
If you have the 1.6x lens in place you should check the "auxiliary magnification" box next to the objective so it can correct the pixel size.
Oil
Using the correct refractive index (RI) oil is important to give minimal spherical aberration and the best results. The software has a calculator where it predicts the optimal oil based on sample RI, objective and temperature. Click lens information to access the calculator.
Example good starting points for live samples close to the coverglass
- RT 1.514 - 1.516
- 37C 1.522-24
Attaching your sample to the stage
The stage has a holder for slides: The slide sits against the three brass clips and spring. Use the insert adapter for 35 mm glass bottom dishes.
Viewing your sample through the eyepieces
Raise the objective so the oil touches (or it is about the right distance away if it it is a dry lens)
Rotate the eyepiece wheel so the appropriate filter is in place (it tells you in the filter window under EP=Eye Pieces)
Then use either the Transmitted or Fluorescence switch on the bottom left of the keypad to switch the light on and off. Be quick if you use fluorescence, ideally try and only use transmitted light if you can.
Move the stage around with the joystick. You can change speeds with the buttons just above the joystick - slow, medium or fast.
If you want to find multiple locations you can mark the points of promising points with the "mark position" key, bottom right on the keypad.
Transmitted light
If you want to acquire transmitted light images (DIC or brightfield) you should optimize alignment of the condenser (Kohler the scope).
The field aperture is above the environmental chamber, the condenser focus is a silver knob on the left of the condenser, the XY positioning are a red paddle and small silver knob on the right of the condenser. Condenser aperture is on the left side of the condenser.
If you want want DIC - choose the appropriate condenser prism for the objective (eg 6 is for the 100x). You can adjust the sheer with the prism underneath the objective
Why does the light look green? The LED light goes through a green filter so the light is off a narrow range of wavelengths, this helps produce better DIC and the camera is monochrome so will never know (don't tell it or it will begin to doubt itself).
Toggle the port selector on the front of the scope to camera
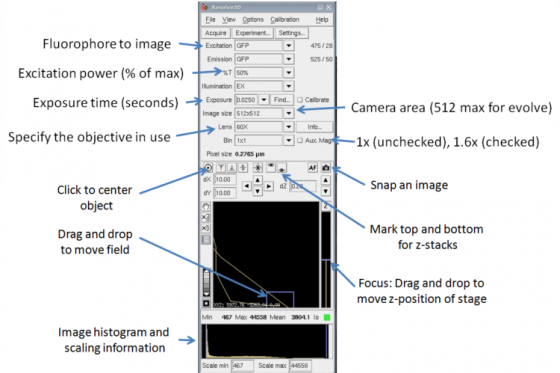
Configure the "Resolve3D" panel. This is where you can find good settings for acquisition.
Click "Experiment" at the top of the "resolve3D" panel to give you the part of the software for more complicated multidimensional acquisition.
Follow through tabs and specify those you require:
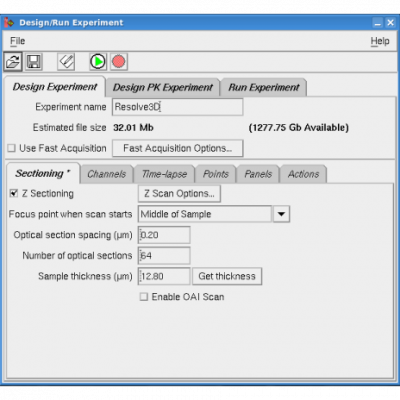
Z-sectioning
Thickness and image spacing of the Z-stack you want. Get thickness imports top and bottom from the "Resolve3D" panel.
Channels
Specify multiple channels - "Refresh exposure conditions" imports settings last used for each channel from Resolve3D
Reference image allows you to take single mid-plane image (rather than stack) good for DIC with fluorescence stacks
Time-lapse
Interval and total time.
Specify ultimate focus to maintain a constant coverslip position.
Points
You can specify to visit multiple points to capture more data per run. Mark several point and view the points list, Icon to left of the stage trails diagram.
Panels
Tiled images to capture large objects at high-resolution
- The green triangle starts the experiment.
- You can save settings as an experiment if you want to, if you don't just overwrite the Resolve3D default
- Data is saved automatically in the location specified under Run Experiment or Settings. Change this to data1/your folder or move the files afterwards.
- It will ask you for a root file name which will be iterated for repetitions and positions.
View data
The software has some tools for quick visualization of your data.
View/quick projection opens a dialog box. Drag and drop the number of the desired window to the input
Deconvolve data
Process/deconvolve
Drag window number or file name
OTF is selected automatically.
Change Weiner filter strength and deconvolution algorithm as required.
Taskbuilder
Taskbuilder allows you to configure batch processing of images.
Moving data off the system
All data goes to the /data1 partition, or a subfolder if you specified that. Move the data to your folder at the end of your session.
To connect to //pixels you can double-click the icon and type in your netid and password. Just drag and drop to the window that opens. When you close the window you are logged-out from the server.
The system has 405 nm and 488 nm laser for experiments involving photo-activation, photo-conversion and photo-bleaching. It is optimized for fast experiments with spot bleaching.
- settings/laser
- PK tab of the experiments window
- laser to test
- Align the spot
- Optimize settings for the speed of your process
If nobody is using the system for at least 2 hours please turn off the system . . .
If you used the incubation system, turn off the CO2 module and tank, turn off the heat function and let the air blow through for 5 min while you shut down the rest of the system then turn off the main switch at the back.
- Remove your sample and clean any oil objectives
- Close the software and move any files that need moving
- Record your use of the system using the CoreResearch booking system
- Shut down the main computer from the menu in the bottom-left. (this shuts down the middle computer =4)
- Shut down the microscope controller (5 - tap switch and wait 10 seconds) and laser electronics (3)
- Switch off both cameras - EMCCD (2) switch on camera, Coolsnap (1) powersupply