Capabilities:
- Imaging living samples - any fluorescent protein
- Temperature, humidity, CO2 control
- High sensitivity - EMCCD camera
- Multiposition timelapse
- Tiled images
Only turn on the things you need. The switches are labeled with numbers.
- If you will be using fluorescence turn on the X-cite lamp (#1), otherwise leave it off
- Power strip (#2) on top shelf
- Start up computer under the table (#3) and log in
- (Optional) power strip (#4) on the table, if you are heating your sample (this turns on the incubation equipment)
- (Optional) Evolve EMCCD camera (#5) if you are going to use it
- Microscope (#6, silver push switch on back left)
- (Optional) CoolSNAP camera (#7) if you are going to use it
- Start MetaMorph or ZEN according to your needs
The temperature and CO2 controls are via the TFT screen using the "incubator" tab.
The incubator takes >30 min to come up to temperature and the system become much more stable over two-hours so it is worth warming up the system before you start long experiments
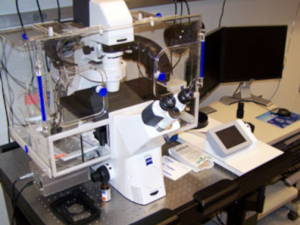
The Microscope
There are 4 stage inserts for holding different samples - a heated insert for 35 mm glass-bottomed dishes, an insert for multi-well plates, a universal frame for holding slides and other samples, and a slide holder. Carefully insert the one you want to use only when the microscope is not powered on. The red dots go together.
Nearly everything on the microscope is motorized so can be controlled either on the LCD touchscreen or through MetaMorph.
Objectives
| Mag | NA | Oil? | DIC? |
|---|---|---|---|
| 2.5x | 0.075 | NO | no |
| 5x | 0.16 | NO | no |
| 10x | 0.30 | NO | Ph1 |
| 20x | 0.8 | NO | DICII |
| 40x | 0.75 | NO | DICII |
| 100x | 1.4 | Yes | DICIII |
- Click "eyepieces" in the MetaMorph task bar
- Select the illumination you want yo use from the drop down illumination menu (top left)
- Click the shutter icon to open/close the shutter (always keep exposure to a minimum)
- Coarse/fine focus knobs are on the microscope, xy stage movement is through the rotary controller, or in MetaMorph. Read how to control the motorized stage in MetaMorph.
Select the camera:
- CoolSnap (right) has better resolution
- Evolve EMCCD (left) has better sensitivity but lower resolution
Select the illumination you want to use from the dropdown illumination menu (eg green, red, DICIII)
Show live to center and focus your sample
Acquisition through the "acquire" dialog box
This is for simple images of your samples. It can be opened from the task bar Acquire or from the dropdown menu, Acquire> Acquire

Things to set in the Acquire window:
- Set the display to 'Autoscale' - the triangles on the image histogram show the scale min and max.
- The image gamma - the relationship between measured and displayed brightness. 1=linear
- Exposure Time - Type in value, mouse-over image to give pixel intensity values (a good exposure time shall make the intensity value of an interested structure at least 3 times more than that of the background.)
- Full chip uses entire CCD camera, sub-arrays produce smaller files and may be faster
- Binning - combines CCD pixels to form n x n super pixels - increases sensitivity but reduces resolution
- Press 'Show Live' to see the specimen through the camera - it may be necessary to focus or move the stage slightly
- Clicking the folder icon allows you to set whether each image starts in a new window or overwrites the previous image (handy for optimizing your image, be careful not to lose your data though)
- External shutter linked to camera should be [Current Shutter]
- Gain and offset for the camera under the Special tab - Start as 0 and 255 respectively
Press the Acquire button to capture the image
Saving images
Simply click save and name your file. Images will be saved as 12-bit TIFF images with all the original data. Not all programs will open these images. Photoshop will open the files as 16-bit images, you will need to adjust the levels ON A COPY of the file. ImageJ or FIJI can open them also.
To save your images as 8-bit files (compatible with all programs)
- Press 'Copy to 8-bit' button on the task bar
- Select the desired image from the 'Image:' drop-down menu
- Press Copy and Save by going to File >Save as (make sure the file name is different otherwise you will overwrite the original)
- 'Overlay Images' pseudocolors / merges images that are also compatible with all other programs.
Acquisition through the "Multidimensional acquisition" dialog box
Open this dialog box for timelapse, multi-wavelength, and z-stacks for 3D acquisition. You can open the dialog box from the shortcut on the taskbar.

Main - Select the things you want to do and then go through each tab:
Saving
- Select directory (if you are acquring at a very high frame rate (eg streaming), use the hard-drive and then move the data afterwards to your server/memory stick)
- Choose a base file name (all the images will be named basename-t1z1 etc)
- Check the increment base file name box
Timelapse
- Choose number of time points, duration and interval (one will always be a consequence of the other two)
Wavelength
- Illumination - choose from the dropdownmenu
- Set exposure time - minimum possible to get a reasonable image
- Set binning (2 is a good starting point for many live samples)
- Press the full chip button once before you start to make sure the entire camera chip is used
- Test the settings using the live and snap buttons at the bottom of the box (mouse over to label which is which)
Display
- Default is okay for most things, for high frame rates they should be minimized to not slow down the computer
Summary is an overview of the settings for your experiment
Press the green acquire button to start your multidimensional acquisition.
The most recent image/stack of each channel will be displayed as you acquire.
Review multidimensional data
A. Tell metamorph which images you want to build. Press "select base file" in the main review MDA window which gives you this box -

- Select directory - point to your folder with the images
- Select data set - choose the individual experiement you want to look at
- Press View
B. Select the wavelengths, stage positions, Z-slices and timepoints you want to view.

- Select the stage position (one at a time here) and channels you want (probably all of them)
- Right clicking in the boxes selects that image. Right click on the row/column heading selects the entire row/column
- You can choose multi-colour overlay (under display), projection, or best focus if wanted.
- Use the play and reverse arrows to view the timecouse etc.
- Load Images loads the select images to a single .stk file which can be saved as one or exported to avi or quicktime (Stack/Make Movie from the top menu).
If there is somebody using the scope after you in 1 hour, clean the objective(s) you used using lens tissue, close MetaMorph. If the person after you is not going to use some of the components they can be turned off -
- The fluorescence light source (#1) can be switched off even if the rest of the system is on
- Incubator can be turned off as below using the touch pad and then turning of switch #4 (it's a good idea to cool the heater by setting the temperature before 20oC and letting the fan continue working for 15 minutes)
If there is nobody booked after you within 1 hour, shutdown the system in the reverse order of startup, switch 6 to switch 1:
- Turn of the CoolSNAP camera is you have used it
- Using the LCD touch screen, turn off the Heating Inset P and the CO2 and turn down the XL unit to 20oC and open the incubator doors (This blows cold air through the system so the heating elements are not damaged). After 15 min, when the air coming into the incubator is cold, it is safe to turn off the rest of the microscope (#6)
- Turn off the Evolve EMCCD camera (#5), if you have used it
- Turn off the incubator powerstrip (#4, on the table), if you used it
- Close the imaging program, shutdown the computer (#3)
- Turn off the main power strip (#2, on shelf)
- Turn off the fluorescence lamp (#1)