Capabilities:
- Incubation system allowing multi-day timelapse
- Fluorescence and transmitted light DIC imaging
- Up to 8 samples can be imaged per timelapse
- Multiposition timelapse
- Z-stacks
- Liquid handling - change media or add drugs
- If you will be using fluorescence, turn on the X-Cite lamp (#1), otherwise leave it off
- Turn on switch #2 for the microscope and camera
- Start up computer (#3), log in, start VivaView FL (MetaMorph). Please note, if you don't use the fluorescent light and therefore don't turn the X-Cite lamp, there will be an X-Cite no-connection warning hidden behind the VivaView FL starting window. You will need to move away the VivaView window to see it and clear it.
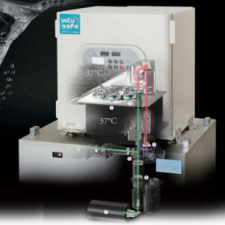
The actual incubator stays on all the time.
- Open the incubator doors
- Swing the transmitted light illumination arm gently to the right
- Unscrew the specimen tray and take the tray out of the incubator
- (The following steps can be done in the hood in 4230 of MSRB3)
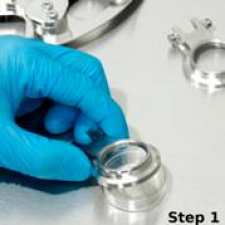
- Step 1: Replace the original dish lid with the special Olympus dish lid. Remember the identity of each dish if you have multiple specimen dishes! Writing on the side of the dish isn't a bad idea.
- Step 2: Load the dishes (with the Olympus lids on) on the specimen tray. VERY IMPORTANT: if you use the hinged lids, the hinge side must be inserted towards the center of the speciman tray. Otherwise, you will damage the system! Make sure to push them all the way in. There are marks #1 through #8 for each position on the tray. Remember the position of each dish.

- Return the specimen tray to the incubator and tighten the screws.
- Gently return the transmitted light illumination arm and close the doors of the incubator
Possible modes: timelapse, multi-wavelength, multi-position, and z-stacks acquisition
Open the dialog boxes for "LCV Control Panel" and "Multi Dimensional Acquisition"

In "LCV Control Panel"
- Choose "Magnification"
- Click to choose the dish you want to observe. The dish number will be shaded.
In "Multi Dimensional Acquisition" tab, under "Wavelengths"
- Decide how many channels needed for the experiment
- Choose an "illumination" method from the dropdown list (e.g. DIC, GFP 25%, RFP 12%) for each selected channel, starting with DIC
- Use the "Live" button to focus with transmitted light (the same button is used to stop "Live".)
In "LCV Control Panel"
- Use the arrow heads to control the position in X-Y direction
- Use the Z handle on the table to focus on the cells (coarse or fine focusing is selectable). The default loading position for 20x objective lens is 2500. Raise up the lens by using the focus knob. When the cells are in focus, the Z position should be at about 3200 for a typical MatTek dish. Please be very careful if you raise the lens over 3500 because there is a danger that the objective lens crashes into the glass bottom of the dish, breaks it, and the medium will disastrously flood the system.
In "MultiDimensional Acquisition"
Go through the tabs in "Multi Dimensional Acquisition" dialog window and set up other conditions for acquisition.
Main - Select the things you want to do and then go through each tab:
Saving
- Choose the Data Drives to save your images. Never save your data in C Drive. If needed, make a new folder for the experiment under your lab folder
- Choose a base file name (all the images will be named basename-t1z1 etc.)
- Check the box for "Break up into multiple files based on sample loader position " if you wish to group the images from different positions in each sample dish.
- (The hard drive on the VivaView is not for permenant storage of your data. You are expected to move your data as soon as you can. Per LMCF policy, any data can be deleted without prior notice if space is required for new experiments.)
Timelapse
- Choose number of time points (or duration) and interval (one will always be a consequence of the other two)
- The interval is best determined to be short enough that you won't miss any critical biological events you wishs to record and long enough that the cells are not damaged by phototoxicity; It is also best to have an interval that at least a few seconds is left open between the acquisition cycles.
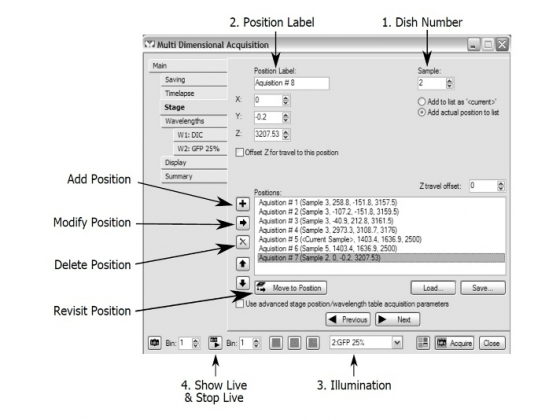
Stage - For assignment of multiple positions
- Choose a "Sample" (dish) number;
- Choose a "Position Label"
- Choose illumination and start the "Live" mode.
- You can add a position ("+") to the list or delete a position ( "X ")
- To revisit a memorized position, highlight that positon and click "Move to Position" or simply double click that position. Any change in X-Y or Z of a revisited position can be saved by clicking the modify button and overriding the old X-Y or Z information.
- In addition to setting up the exposure time for each channel (see above), you may allow the microscope to "Auto Focus" in one channel (e. g. DIC) every "n" acquisitions to correct possible focus drift. This is generally not necessary after your samples have been settled down in VivaView for a few hours. Let the microscope update the new Z position for all other channels.
-

Display - Default is okay for most things, for high frame rates they should be minimized to not slow down the computer
Summary - It is an overview of the settings for your experiment
Press the green "Acquire" button to start your multidimensional acquisition. The most recent image/stack of each channel will be displayed as you acquire. An acquisition status dialog box appears.
The acquisition can be paused for modification of positions (X-Y and/or Z), adjustment of time interval, or for the addition of treatment reagents
For adjustment of positions:
- Click "Pause" button.
- Choose a "Position Item" and click "Go to"
- Choose a "Wavelength " and start "Live"
- Adjust X-Y and/or focus of the position, "Set to current" to update the new information
- Repeat for other positions as needed
- "Resume" to continue the experiment
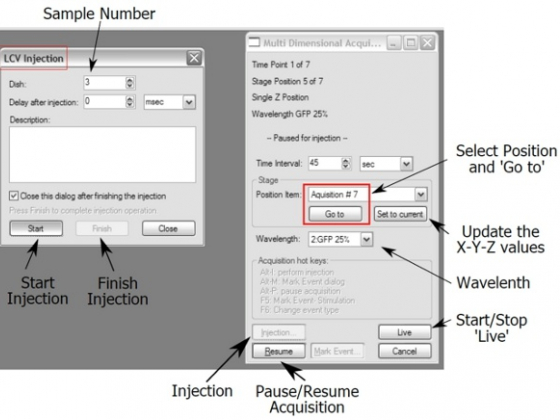
For addition of reagents to the medium (only works when hinged lids are used)
- Click "Injection" button and the "LCV Injection" dialog box appears
- Choose a sample (dish)
- Click "Start " and watch in wonder as that dish moves into place and the lid opens!
- Open the incubator door and load the reagent through the window on the inner glass door
- "Finish" when it is done
- "Resume" acquisition
Open the "Review Multi Dimensional Data" window. Tell MetaMorph which images you want to build.
Select the wavelengths, stage positions, Z-slices and timepoints you want to view.
- Select the "Stage Position" (one at a time here) and channels you want (probably all of them)
- Right clicking in the boxes selects that image. Right click on the row/column heading selects the entire row/column. Right clicking again de-select the image.
- You can choose multi-color overlay (under "Display"), "Z projection", "Select Best Focus", or range of time points to be reviewed if you want.
- Use the play and reverse arrows to view the time course etc.
- "Load Images " loads the select images to a single file which can be saved as one or exported to "avi " or "quicktime " (Stack/Make Movie from the top menu).
Make Movie from MetaMorph Stack File
- Load image stacks (see above)
- To stamp "scale bar" on the images, you need first to make sure the image size is calibrated. In menu, "Measure "--> "Calibrate Distance", pick the magnification and click "Apply"
- Open "Calibration Bar" dialog box from "Display " --> Graphics --> "Calibration Bar "
- Find a place on the image for the future bar. Choose bar size, bar and label intensities (usually choose the absolute white point intensity of the image)
- "Stamp" the scale bar on the image.
- Similarly, you can stamp "Date and Time " on the images. Choose "All Planes " to display "date and time " on all image stacks
- "Stack " -->"Make Movie ". Those steps in there are self-explanatory.
If there is somebody using the scope after you within 1 hour, close MetaMorph, move your data, and leave the system on.
If the person after you is definitely not going to use the X-Cite for fluorescence imaging, it can be turned off even if the rest of the system is on.
If there is nobody booked after you within 1 hour, shutdown the system in the reverse order of startup.
- Close MetaMorph, move data, shutdown the computer (#3)
- Turn off the microscopy and camera by switching off #2
- Turn off the fluorescence lamp (#1)
Put the Olympus dish lids in the hood with inside up, turn on the UV to sterilize them.