
Capabilities of Zeiss Laser Microdissection:
- Cut and extract regions of a tissue
- UV (355 nm) cutting beam
- Non-contact capture
- Also provides stitched imaging of large areas with fluorescence and color camera imaging
- Main power switch (#1)
- Control box (#3), turn the key clockwise from 'Off' to 'On'
- Computer (#4)
- Log-in to the computer
- Open the program: AxioVision 4.8. Please don't work on the microscope before the program starts otherwise the program may crash
- Push back the light arm on the microscope. Secure the slide in the slide holder and make sure the sample side is up.
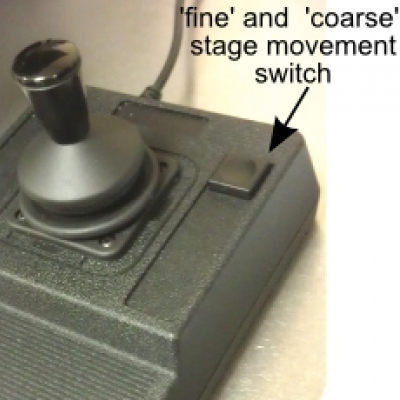
- Using the joystick to move the stage and position the sample right above the objective. The joystick has two groups of speed available, fine and coarse, that can be toggled by pushing the button on the upper-right corner of the joystick base. In 'coarse' group, there are additionally 3 distinct speeds dependent on the force you apply to the joystick.
- On the touch screen on the microscope, choose an objective under 'Objective'. The 20x, 40x, and 63x objectives on the microscope have correction rings. When using a standard glass slide (about 1 mm thick), check and make sure the black-colored line mark on the corrective ring is aligned with "1" on the lense barrel.
- The transmitted light (TL) on the microscope is turned on already when you start the system, and the sample can be viewed in the eyepieces. Light intensity is adjustable using the wheel on the lower front of the microscope.
- Focus on the sample.
-
PositionMagnificationNACorrection Ring15X0.25No210X0.50No320X0.40Yes440X0.60Yes563X0.75Yes6Empty
- In the toolbar area, choose AxioCam ICc camera, the color camera.
- In the 'Workarea' panel, choose AxioCam ICc too.
- When the system starts, the camera is on and a 'live' image is shown on the screen. You can 'Stop Live' or 'TL Live' from the toolbar to switch off or on the 'live' mode when you need to.
- Make the live image in focus.
- * Click Evaluate icon
at the bottom of the live image window. This ensures the image is initially displayed with linear contrast.

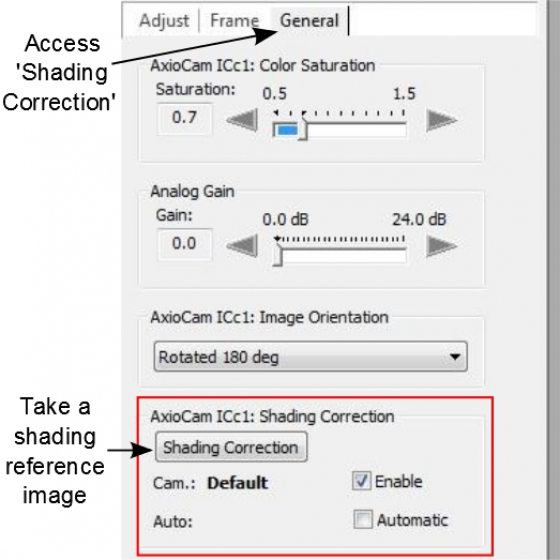
- * Open 'General' tab, in 'Shading Correction' box, deselect 'Enable' if it is already ticked to clear the previous shading reference from system memory.
- Adjust the intensity of the image through changing the exposure time or turning the illumination wheel on the microscope. Make sure in the histogram all 3 colored curves, representing red, green, and blue colors, are ended on the bottom line of the graph. In other words, there is no clipping in either low or high intensity portion of the image.

White balance and shading correction should be done with each objective used for imaging to achieve the best stitching result even if the image isn't visibly unbalanced in color or non-uniform in illumination.
- While keeping the sample at the same focal plane, move the slide to a clear area that is clean and devoid of any dirt (you might actually want to defocus very slightly to make any dust out of focus). Recheck the histogram and make sure there is no clipping
- In the 'Adjust' tab, Perform 'Automatic' white balance. Or start 'Interactive ...', and the mouse cursor will become an eyedropper. Use the 'eyedropper' to pick an clean spot in the image as the white reference
- Go to 'General' tab and click 'Shading Correction' to take a reference image (it is not visible, but it is kept in memory)
- Observe the image on the screen. It should be clear and white.
After conducting white balance and shading correction, keep the objective, exposure time, and illumination level unchanged. Otherwise, the white balance and shading correction need to be done again.
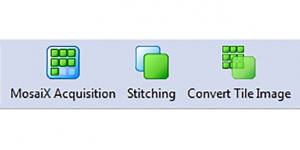
- Click to open the 'MosaiX Acquisition' from the toolbar panel. The MosaiX Acquisition' dialogue box will show up. Click 'Setup' to open the 'Acquisition Setup' window.

-
* In 'Acquisition Setup' window, first reset (using tool) the origin of the stage, marked as a thick blue-lined square in the 'Navigator'. This will avoid crashing of the objective to the stage. So it is very important !
- A live preview image of the sample will be shown at the lower-left corner of the setup window.
-
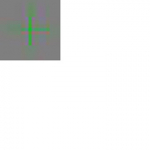
The current position is marked as thin-lined green cross in the 'Navigator'. Double-click at a point within the 'Navigator' will drive the stage to a position. The green cross will follow and show in the new position. The live image also updates in real-time.
-
To add that position in memory, click the icon. If you add two positions, the 'Navigator' will show a rectangle with the two marked positions at the diagonal corners. Within the rectangle, future image tiles are displayed. All those tiles, when combined, cover the whole area to be scanned.
- To expand the coverage, double click outside of the rectangle area, which moves the stage to a new position. Click the icon again. The rectangle will be updated to include the newest position; To trim the area, click a position inside the grid and click one of the arrows for your desired direction.

- Focus correction: for a large tissue section, it is almost impossible to have the whole tissue area flat. 'MosaiX Acquisition' can take the image tiles at different focal levels of your choice.
- In 'Acquisition Setup', open 'Focus Correction' tab.
- Double click on a tile to move the stage to the position, focus on the sample, and add this position (with its X, Y, and Z parameters) to the list.
- Repeat the above step.
- The system will interpolate between the focus correction points during acquisition. As a result, positions are preferably not far away from each other.
- When done, click 'OK' at the lower-right corner of the 'setup' window to close it.

- Back In 'MosaiX Acquisition' window, choose 'on' for 'Focus Correction'.
- 'Start' acquisition of the image tiles.
- Save the images using 'Save as' function. 'ZVI' and 'TIFF' are both good formats.
- Please pay attention to the projected image size shown up in this window. They are usually big. You want to clean the computer memory by closing images you have just saved.
- Image tiles will be displayed in the document window. 'Tile View' shows all tiles with information of relative positions.
- Click 'Stitching' to start stitching function.
- In the 'Stitching' window, choosing low numbers for 'SearchDepth' and 'MinimumOverlap', and making 'SobelSize' 'Low' or 'None' usually work well. Click 'OK' to stitch the tiled images.
-
Using the 'magnifier icon' near the bottom of the image window to zoom in on the stitched image to examine how well the stitching work is executed.

- If not satisfactory, in 'Tile View', click to revert stitching. Adjust the 'SearchDepth', 'MinimumOverlap'
and 'SobelSize' before performing another stitching.

The stitched image is composed of individual tiles (realigned after stitching). You need to convert them to a single image file to finalize the process.
- Click 'Convert Tile Image' to open the conversion window
- Changing 'Zoom' allows resizing (only reduction of image size is possible) of the final images, and of course the reduction of the image quality. The final image file size will be changed by a factor of the 'zoom factor'2.
- When there isn't a need to convert the whole stitched image, one can convert only a region of interest. Select 'Yes' for 'Use ROI'. The ROI is illustrated in the image and can be resized by dragging the borders and corners.
- Click 'OK' to convert the stitched tile images
- A separate image is created and should be saved.
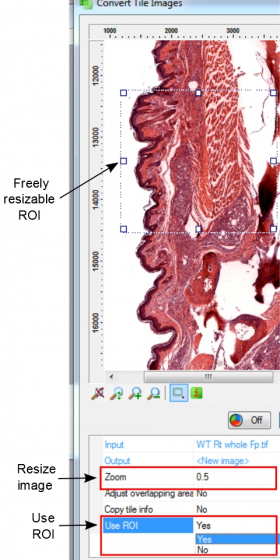
Image tiles acquired in AxioVision and saved in .'zvi' can be opened and processed in ZEN 2 Pro and above (available on FFSC 64-bit workstation). To stitch the tiles in ZEN 2 Pro:
- Open the .zvi file
- Open 'Processing' tab and select 'Stitching' in 'Method'
- In 'Input', select the tile file; In 'Parameters', choose 'New output' and 'Fuse tiles'
- Click 'Apply'
- Save the newly generated file in '.czi' or '.zvi' format
To reduce the size of the stitched image, some of the methods are:
- Use 'Resample' function under 'Processing'. Resample factor smaller than '1' reduces the resolution of the image
- Use 'ROI' functions to select desired area: open 'ROI' function under 'Graphics', draw a region, right-click in it, and 'Create subset images from region of interest' to duplicate the selected area.

-
From the toolbars at bottom of the image window, click to bring up 'Properties' of the image.
- To achieve the best visual effect, the brightness, contrast, and Gamma of the image can be adjusted separately. The black curve in the histogram can also be repositioned to reset the white point and the black point in the image. Most of the time, one click of 'BestFit' will do a very nice job too. Those adjustments only affect the display of the image and will be ignored when the image is directly 'saved as'. To keep the display, 'Apply display mapping' needs to be selected before saving the file.
-
From the toolbar panel at the top, click icon and draw a scale bar anywhere on the image. The scale bar will be saved along with the image if 'Burn in annotations' is selected when saving
As the laser and arc lamp on this machine are not used, the system can be turned off after the session. Record your use of the system using the CoreResearch booking system.
- Turn off the computer (#4) from the start manu, turn off #3, and lastly, switch off both power strips (#1).
- Cover the microscope.
- Lock the door behind you if you are the last one in the room.