Capabilities:
- Imaging diverse fluorophores in fixed or live samples
- Temperature, humidity, CO2 control
- 3D z-stacks, timelapse, stitching, multi-position timelapse
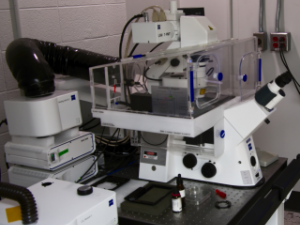
Power Up
- Turn on the X-Cite (if you need to see fluorescence down the eyepieces to find your sample)
- (If you want to use the incubator turn on the rocker switch on the back of CO2 module and make sure the water bottle is filled between the red lines with DI water)
- Turn on the Main Switch
- Turn on the Scope switch
- Turn on the Laser switch
- Turn on the Lasos Argon laser power supply by turning the key to position 1 if you will use it and check it is set to "Run" not "idle"
- Turn on the PC
- (Incubator - use the touch pad to set the incubator as you want to use it - H Insert P is the heated plate for small dishes, H unit XL is the heater for the environmental chamber, H insert M is for plate, H dev Humid is the warmer for the humidifying water. CO2 can be set to the % you want and make sure the tank is on at the main valve).
Select the "LMCFuser" account and enter the password.
If the system is left on for you check the Argon laser is in run mode.
Open the Software
Double-click the ZEN icon on the desktop and choose "Start System" when the boot status window pops up
Go to the Ocular tab, click online and choose the means of viewing - Brightfield, Blue, Green or Red fluorescence
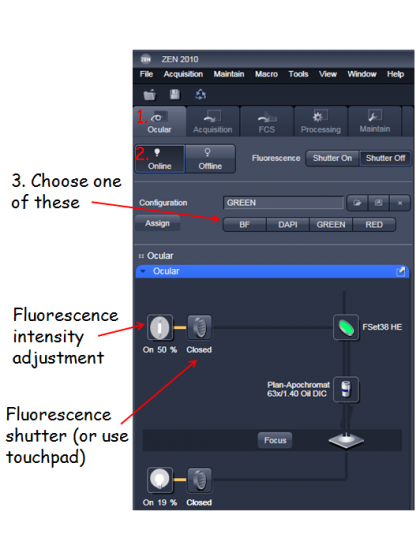
Click "RL Illumination Off" on the touch pad or the shutter off button to turn off fluorescence (if you just use BF leave it on so the system automatically turns that on each time you go to ocular)
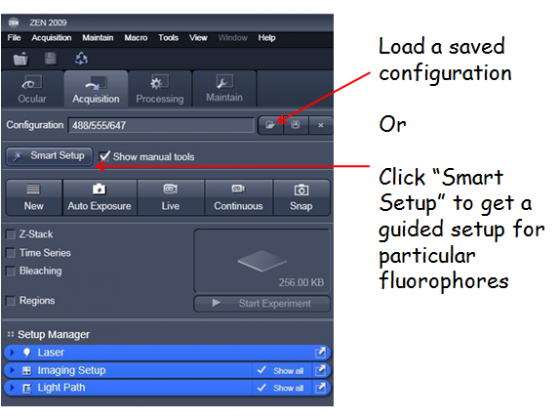
Click the "Acquisition" tab so you see all the settings for confocal imaging. If the "Show manual tools" box is unchecked some of the less common adjustments are hidden (the Show all check marks on each blue bar gives a similar option).
Setup
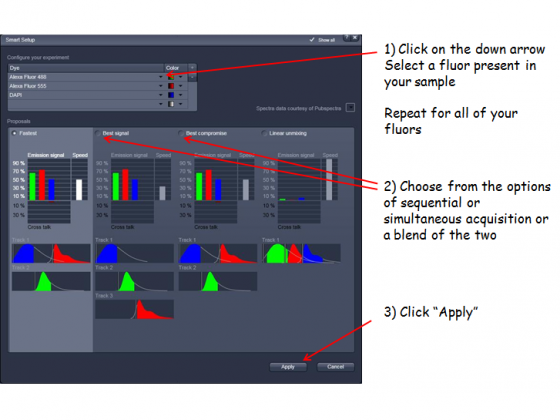
If you follow the smart setup path . . .
Manual setup
Or you can manually change the excitation lasers, emission bands, dichroics etc in the Imaging Setup and Light Path tabs.
- The MBS (Main Beam Splitter = dichroic) needs to match the lasers used in the visible and 405 light paths)
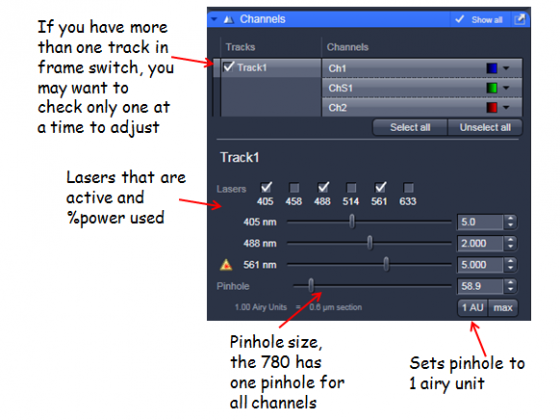
- One track for simultaneous imaging of the channels, more than one track for sequential scanning
- For multi-track: Frame switching should be used if different dichroics, pinholes or overlapping emission bands are required. Line switching is more convenient and possible when only electronic things change between tracks (eg AOTF control of excitation, which detector is active)
- Ch1 and Ch2 are standard alkali PMTs, ChS1 is an array of 32 high-sensitivity GaAsP PMTs. This can be used as up to 8 channels in Channel mode (but they have to have the same gain at any time, but different digital gain is allowed).
- If you have created a configuration you can save this for easy reloading in the future
- Please ask if you need some help to design an optimal setup for your particular fluorophores and experiment.
Pressing Auto-Exposure is a good starting point to get an image on the screen to optimize. Auto-exposure changes the detector gain values so something is visible.
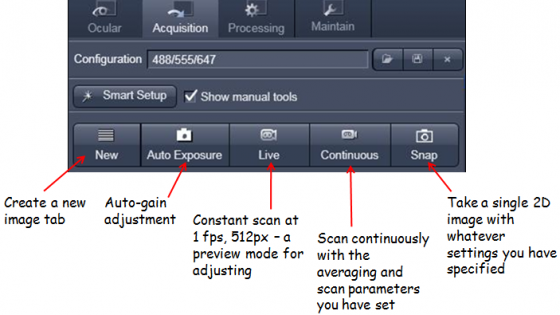
Live (this was called FastXY in the 510 software) constantly scans quite quickly at a fairly low resolution to allow you to make adjustments. (If you need to have the scan parameters you will subsequently adjust to be in effect you can press continuous).
Adjust the z-position with the coarse/fine focus knob (notice these are on the touch screen pad as well as the microscope) to choose the plane of interest. If you are taking a z-stack generally choose the brightest plane to adjust the settings.
Zoom - you can do this with the "Crop" button underneath the image - resize the box that appears - or using the scan area controls in the Acquisition Mode panel.
Laser powers - adjust the sliders (note the are non-linear) so you have reasonable excitation. The lowest value you can get away is best to minimize fluorophore saturation and photodamage.
Pinhole - adjust so a suitable optical slice is obtained. A trade-off between z-axis resolution and brightness. A pinhole of one Airy unit gives essentially gives you the best resolution, opening it slightly from there will allow you to collect more signal.
Gain/offset optimization - adjust the gain (detector sensitivity) and offset (background level) for each channel. Selecting range indicator is helpful when doing this. In this mode saturated pixels are highlighted red and 0 intensity blue, a few red pixels and the background 50% blue is often a good point to aim for.

Averaging and scan speed - Averaging and slower scan rates improve SNR, choose a good balance for quality and speed.
Sampling rate - The number of pixels in the image can be selected. The optimal button selects the correct number for a particular objective, wavelength and zoom. This will give you a digital sampling rate adequate to fully sample the optical resolution.
The acquisition Mode panel also allows you to adjust between unidirectional and bidirectional scanning (faster but sometimes causes image degradation), and the bit depth of the images (8bit is fine for standard imaging, 12-bit may help with some quantification).

Click the disk icon beneath the open images icons to save the selected image as .lsm files. Generally it is best to save to the Data drive and move the data to a server, USB drive etc after you have closed the software.
The software creates a new tab in most but not all acquisition cases so save as you go to avoid loosing anything.
The LSM image format can be open by the free offline viewer or ImageJ (links here). You can export images as TIFF from the File\Export menu.
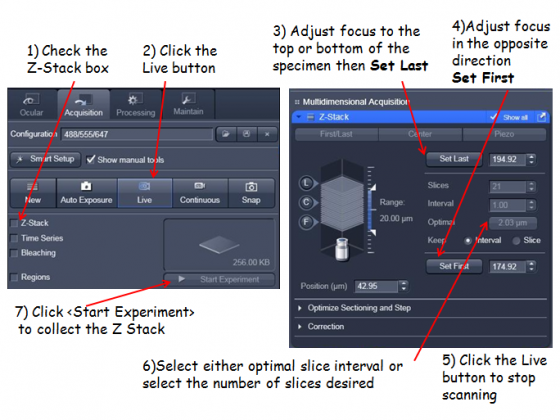
- Select the Time Series box underneath the Z-series box of above
- Choose the number of time points and the interval between them
- Press start experiment
And of course you can do a time series of a stack by having both things active. You will end up with a 4D dataset that can be saved as a single .LSM file.
- Clean any immersion objectives that you used
- Move your saved data as appropriate
- Record your use of the system using the CoreResearch booking system
If the next user is scheduled within 2 hr, please put the system to standby
- Close the Zen software
- Flick the small switch on Lasos controller board to standby.
If nobody is scheduled to use the confocal after you, please power down the system
- Turn key on Lasos black box (6) to 0 position and wait for about 3 min until fan shuts off.
- In the meantime, exit Zen software and shut down PC from the Windows Start Menu
- (if you used the incubator: you need to cool down the H unit XL before turning it off otherwise it is damaged. Select a low temperature like 20C for the H unit XL and run for 5 min. Then turn off all the units on the touchpad and turn off the rocker switch on the back of the CO2 controller)
- Turn off System PC and components switches after the cooling fan from 1 is quiet. (4 & 5)
- Turn off Main Switch (3)
- Turn off X-Cite (1)