
Capabilities:
- Imaging diverse fluorophores in fixed or live samples
- Temperature, humidity, CO2 control
- Spectrally tunable detectors
- Ultra-fast resonant scanning (reduced photo-damage with live samples)
- 3D z-stacks, timelapse, multi-position timelapse
- FRAP/FLIP/Photoactivation, FRET (ratio or acceptor photobleaching)
- Fluorescence source (#1)
- Laser power (#2) and keyswitch
- Scanner power (#3)
- PC microscope switch (#4)
- Login to the local computer account
If you want to use the incubator, turn on the cube on the shelf. If you also want to use CO2, connect the stage insert and adjust the red regulator
Open the Leica confocal LAS AF software (it takes a few minutes to boot up)
- If you want to use the resonant scanner (for live cell imaging) check the box, otherwise make sure it is not checked
(no need to click on microscope or configuration) - It asks if you want to initialize the stage - This is not necessary unless you want to do tiled scans, so click no.
Configuration tab --> laser
Check only the lasers you want to use. Adjust Argon power (20 % is a good start for most imaging)

| Laser | Lines (nm) | Colour of fluorophores | Examples of fluorophores |
|---|---|---|---|
| 405 Diode | 405 | Deep blue | DAPI |
| Argon | 458 476 488 496 514 | Green (Cyan and Yellow) | GFP, Alexa 488, FITC, CY2 |
| 561 Diode | 561 | Red | Alexa 568, TRITC, CY3 |
| 594 gas | 594 | Red | Alexa 594, Texas Red, mCherry |
| 633 gas | 633 | Far-red | Alexa 633, CY5 |
- It is easiest to change objectives using the software

| Mag | NA | Dry/water/oil |
|---|---|---|
| 10x | 0.40 | DRY |
| 20x | 0.70 | DRY |
| 40x | 1.25 | OIL |
| 63x | 1.20 | WATER |
| 100x | 1.40 | OIL |
- Coarse/precise switches for xy control and focus
- Transmitted light - Top button behind leftside focus control
- Buttons for changing cubes (DAPI, green or red) and opening/closing the fluorescence shutter at front
Acquire tab, Acquisition sub-tab
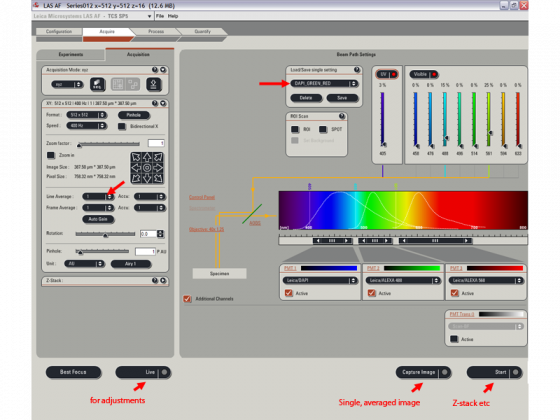
- Load/save single setting - choose the combination of colors you have in your sample
- You can adjust the laser power and exact range of wavelengths collected for each PMT
For multi-channel specimen, sequential acquisition is strongly recommended (see following)
Click "live" in the bottom left corner
- Adjust z-position (=focus), pinhole, zoom
- Adjust gain and offset for each channel (click the image to select)
Choose glow scale (green=under, blue=over) for more accurate adjustments
Adjust the line averaging number (marked with red arrow above). You need to empirically determine what is best for your sample but 2-8 are common values.
The number of pixels can be changed from the starting value of 512*512 under "Format". Minimal of 1024*1024 is desired for publication quality images.
Press Capture for final image, the image window has these buttons (the stack ones are only present if you have a series).

Z-stack acqusition
Set everything up as above for the brightest region of the stack. Then specify the top and bottom of the stack and the number of slices . . .
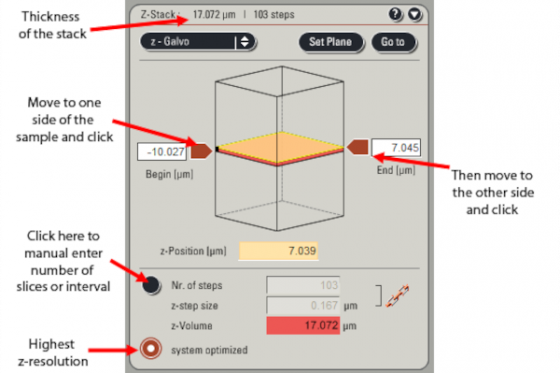
Press "start" to capture the z-series. It will do whatever averaging you have set for each slice.
Sequential acquisition
This is worth doing when you image multi-color specimen and have bleedthrough between channels (most common with DAPI and green).

Press the "seq" button, which opens the sequential scan box.
Click 'Load' and open a saved presetting that fits your speciman. Use the presetting as a good start and adjust the parameters according to your needs.
Or set up a new sequential scanning by clicking the '+' to generate how many scans you need
For scan1 set all laser powers to zero except for one laser line, deactivate all but the relevant PMT
Scan2, set up the next laser and PMT . . .
Press the "seq" button again to exit sequential mode.
Click the "Experiments" sub-tab
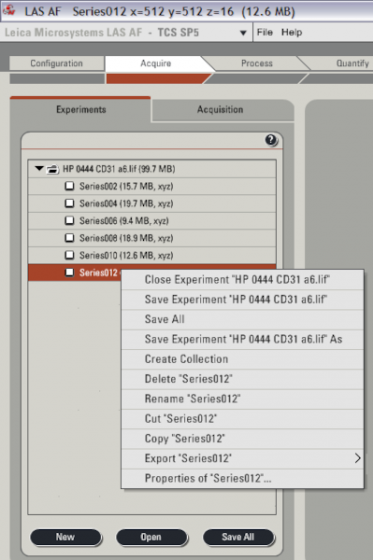
- Right click on each to get various options (rename as you go is recommended)
- Images are stored in Leica format (.lif), can export to Tiff (right click on the .lif file to export all at once)
- If you are using USB memory it is more stable to save to the D:/ drive and then move the data afterwards
- Press Save All fairly regularly in case of crashes
Please clean any oil/water objectives you used and stop your session in the CoreResearch booking system if you finish much earlier than the scheduled ending time.
If someone is scheduled within 2 hours -
- Argon laser to 0%, turn off any laser that won't be used by the next person (check the booking calendar comments)
- You may leave the program open or close it
If you are the last person of the day or nobody is using the system in the next 2 hours -
- Argon to minimum and all lasers off (i.e. uncheck the boxes in configuration-->laser)
- Shut down the computer from the start menu
- Wait for the Argon laser cooling fan to turn off (if you used it and it takes about 5min)
- PC/Microscope switch (#4)
- Scanner power (#3)
- laser power (#2) and key
- Fluorescence source (#1)
If you used the incubator and it is appropriate to turn it off (ie you are the last person, or the next person doesn't want to use it), you can turn off the cube on the shelf and the red CO2 regulator at any point.