A Quick Guide:
Startup: Computer (#1), login, main power switch (#2) and power for lasers (#3)
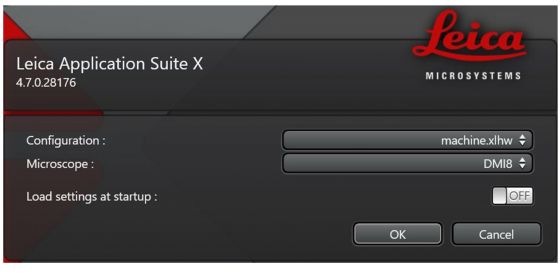
Launch LAS X: Choose ‘machine.xlhw’ and ‘DMi8’; Set ‘load settings’ to ‘OFF’
Choose objective lens on the touch screen on the microscope
Place sample on the stage with cover glass side toward the objective lens
Start the fluorescent light using the touch screen and focus on the sample
Set up a multi-channel scanning (for most cases) in LAS X:
(A). Open ‘Dye Assistant’
(B). Find your fluorophores from the database and add them to HyD detectors one at a time. Both HyD S and HyD X are available on the microscope, but HyD S is preferred for the first 3 channels.
(C). In the options put forward by the program, choose the setup with sequential scanning between lines
Click and choose one channel, start ‘Fast Live’
Further adjust focus to display the image from the best focal plane
Click ‘Over-/Under-exposure’ icon to show the image in ‘look up table’ mode
Using the USB Control Panel, adjust ‘Smart Gain’ for signal amplification (best less than 100%) and/or ‘Smart Intensity’ for laser power to reach proper brightness of the structure of interest
Repeat (7) to (10) for other channels
Final image acquisition:
(A). Minimal requirement for image quality: Format: 1024x1024; Speed: 400HZ; Line Average: 2
(B). Use ‘Zoom In’ function when necessary
(C). ‘Capture Image’ to take the image
Under ‘Open Projects’ tab, save the data in ‘.lif’ format
To finish session:
(A). If an oil objective lens is used, clean the lens with lens paper. Avoid touching the lens glass
(B). Check the on-line schedule and leave the system on when another user comes to use the microscope in the next 2 hours; otherwise shut down the system.
- Computer (#1)
- Login the computer
- Main power switch (#2)
- Laser power switch (#3)
- Launch LAS X


1. Open the ‘objective lens’ tab on the touch screen, and choose the objective lens
2. When choosing a lens that requires immersion type different from the lens currently in position, the lens icon flashes. Touch the lens icon again to confirm the choice.
3. Place sample on the sample holder. For standard slide, make sure the coverslip side is down; for samples in culture medium or solution, pay extreme attention not to spill the liquid in the microscope.
4. A few special considerations when using an immersion objective lens:
(1) before loading a slide on the stage, it is preferred to add immersion medium (especially lens oil) to the specimen. 5-10 ul of immersion medium should be sufficient. Using too much of it not only wastes it, but often messes the microscope.
(2) when it is not convenient to add immersion medium directly to the specimen (like samples in culture dishes), add the immersion medium on the lens. Avoid touching the lens with the applicator tip.
(3) if you need to change from an immersion lens to a dry lens, make sure you clean the immersion medium off from the sample first. Otherwise, contamination of the dry lens with the immersion medium likely happens.

5. The sample stage is controlled by the remote Smart Move. Hit a button on the left side of the Smart Move for fast or precise (slow) stage movement.

6. Channel selection: on the touch screen, open the tab for ‘Channels’, click to open FLUO(rescent) illumination. Excitation lights for Blue (LED_405), green (GFP), and red (RHOD_LP) channels are available.
Keep in mind, the fluorescent incident light may be bleaching your samples when it is on. Close the shutter whenever you don’t need to observe the specimen on the microscope.
Transmitted illuminations for brightfield microscopy are also available.

7. Focus on specimen: use the Z knob on the Smart Move or the focus knobs on the microscope to focus on the objects. Focusing speed is adjustable for coarse or fine. Select the speeds using the buttons to the right of the Smart Move, or choose one on the touch screen.
In the ‘stage control’ tab on the touch screen, the current position of the lens is indicated with a red triangle and a red bar. The lower gray bar indicates the lowest position of the lens and the upper gray bar indicates the position where the sample should be in focus.
While you are focusing on the sample, check the position of the lens from time to time to avoid colliding the lens with the sample.
8. Position the object to be imaged near the center of the field.
Scan Setup
There are several ways to set up multi-channel confocal image acquisition. An easy one is to use the ‘Dye Assistant’ tool to take advantage of a dye database included in the program.
1. Click Open Dye Assistant and look for your dyes in the list. Starting with the dye that has the shortest emission wavelength (for example DAPI). If your dye is not in the database, use a similar one from the list.
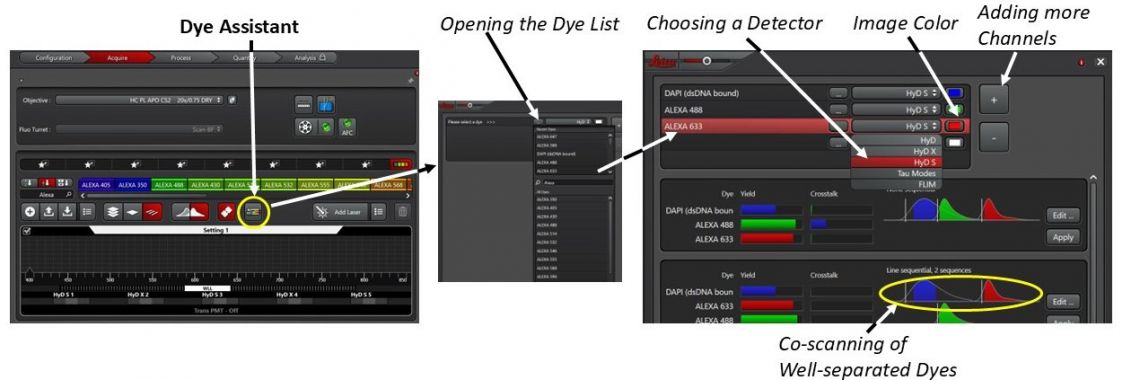
2. Choose the detector and image color for the channel. Repeat this step for other dyes.
The Stellaris 8 is equipped with 3 HyD S and 2 HyD X detectors in the order of S, X, S, X, and S. If you have 3 or less channels, please use only the S detectors. The X detectors tend to be over-loaded easily (with warning sound) on this microscope. If you have to use the X detectors and hear the warning sound, lower the laser power immediately.
3. The system will be suggesting various scanning schemes. To minimize cross-overs between the neighboring channels, please choose the ones with sequential scanning. Line Sequential scanning is preferred.
If the dyes are well-separated in emission spectra, they can be imaged in the same scanning sequence to save time.
4. Click Apply
5. Modifications of the setup:
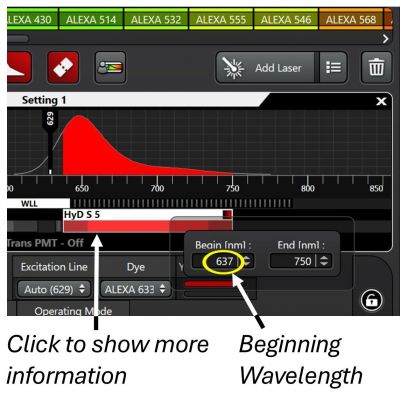
(1) The LAS X is smart enough in acquisition setup. You may start scanning right away. But you may also want to single-click the detector bar to display more information, where you can change the image color, access working modes of the detector, etc.
(2) Double-clicking the bar shows the range of emission that you will be collecting. The range is adjustable by drawing the ends of the detector bar. Make sure the beginning wavelength is separated from the excitation laser line by at least 5 nm to avoid possible high background originated from reflection of the laser.

(3) The excitation laser is automatically assigned for a specific dye by the program. You may also change the excitation wavelength by double-clicking the laser box and change/add a laser line. Or, choose a Notch Filter Line from the list to further reduce the background originated from reflection of the laser.

(4) For those who also want to capture a brightfield image, do it together with a green, red, or far red fluorescent channel. First, click on the channel to activate it (the channel box is highlighted by a white border line). Click the bottom region of the channel box, turn on the Trans PMT.
The fluorescent channel and the brightfield channel just added to it share the same laser power (Smart Intensity).

6. The channel setup can be saved and reloaded for a future experiment.
Another way to re-use the setting from a previous experiment is to open the ‘.lif' format file, right-click on the image, and Apply Image Settings.
Adjusting Image Intensity with Live Scanning
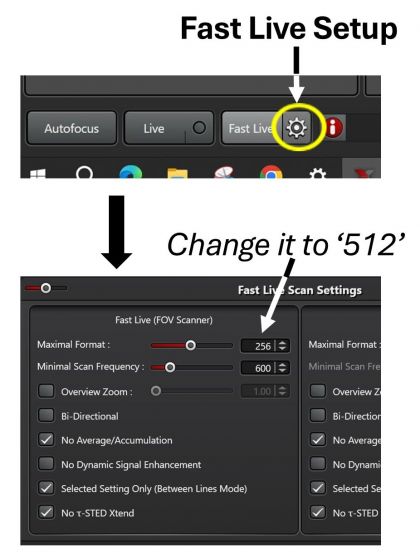
1. Fast Live (preferred): the default image resolution at 256 for Fast Live is rather low. To increase it, open settings and increase the FOV Scanner resolution to 512.
2. Choose a channel in a multi-channel setup by clicking anywhere in the channel area to activate it when the area is marked with a white border line.
3. Start Fast Live and find the best focus you like. Stop live scanning when needed. You may use ‘Zoom’ function at this point (see below).
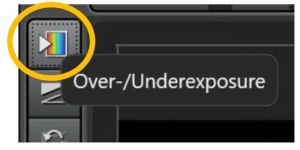
4. Turn on the ‘Over-/Under-exposure’ mode.
5. The default setting of the system is to capture images based on fluorescent Intensity and in Analog mode (HyD S detectors) or Digital mode (HyD X detectors).
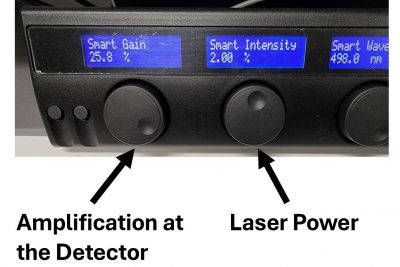
6. Use the USB Control Panel, adjust Smart Gain (amplification of signal) and Smart Intensity (laser power). Although the highest amplification gain is 500%, it is best not to go over 100% to avoid excessive noise. Also, use a laser power as low as possible to minimize photobleaching of the fluorescence and phototoxicity to a live sample.
7. In situations when you scan more than one channel in the same scan sequence, or you rather use the Live mode instead of Fast Live, click on the image panel of the channel to mark it as the active before making adjustment to it.

8. For a specimen with normal fluorescent intensity, a well-adjusted image will have the brightest structure-of-interest to be saturated in a few pixels (shown in blue color in Over-/Under-exposure mode) to utilize the full dynamic range at 8-bit. Avoid over-saturation of the structure-of-interest.
Continuing to click Over-/Under-exposure icon displays images in gray scale and one more click of the icon returns the images in color.

9. Please note, both types of HyD S and HyD X detectors on this microscope can be used in photon Counting mode. In this mode, the Smart Gain is not available for adjustment. Only the laser power (Smart Intensity) is adjustable.
By using photon Counting mode, the intensity of captured image should be linearly proportional to the fluorescent intensity in the specimen. The image data should be suitable for statistical analysis.
Image Acquisition

1. Quality of images: Format (image size) of 1024 x 1024, Scan Speed at 400 Hz (600 Hz is available without being forced to zoom in), Line Average from 2 repeated scans, and Pinhole size at '1' Airy Unit should be minimal and, most of the time, satisfactory for publication, for both image resolution and contrast between signal and background. Higher quality image can be achieved with larger image size, slower scan speed and more averaging (or accumulation).
2. Zoom function: dependent on your need, scanning can be executed in a smaller (zoom in) or larger (zoom out) area than the default coverage on a specimen. Entering a number other than ‘1’ in the Zoom Factor, you will zoom out (0.75 x the minimum) or zoom in from the center of the current region. Start Fast Live to see the zoomed image.
Toggling free Zoom In tool allows you to draw a rectangular region with your mouse in any place within the current image. After zooming, changing the Zoom Factor on a zoomed image will further modify the coverage at the current sample location.
3. Capture Image for final image acquisition
4. If detectors are set for Photon Counting mode, the image intensity of the captured image may be lower than that in Fast Live. Using Line Accu(mulation) instead of Line Average to increase image intensity.
Saving images as '.lif' files
1. All captured images along with the metadata are temporarily stored in the system.
2. Go to Open Projects tab. The image files are listed under a default folder named project.
3. Save project in raw ‘.lif’ format in ‘USER DATA’ drive on the computer. A ‘.lif’ format file contains all the image files in the original folder. Individual image files under project can be saved and processed separately as well.
4. You may create new projects.
5. The data drive on the computer is meant strictly for temporary data storage. LMCF cleans up the data drive when it is needed. It is your responsibility to move and safely backup your data in a timely manner.
Exporting Image
Images within a ‘.lif’ file can be exported so that they can be opened directly with other popular image viewing programs. Images can be exported either individually or all together in the project folder.
The following steps are for exporting individual images:
1. Right-click on the image file and open the Export Image window.
2. Choose your folder to receive the exported images.
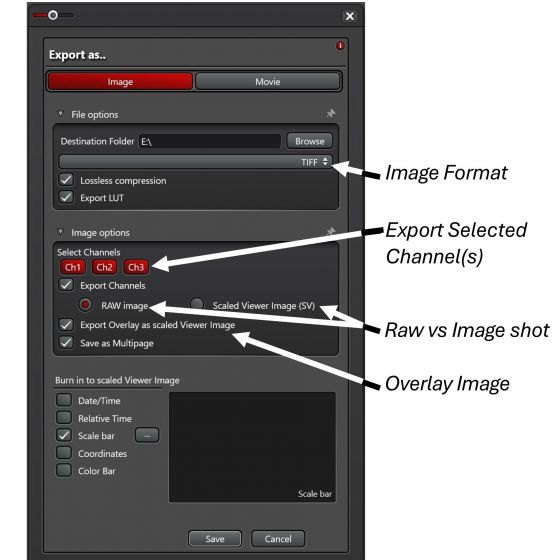
3. Select ‘TIFF’, ‘Lossless Compression’, ‘Export LUT’.
4. You may choose to export selected channel(s) as RAW Image or as Scaled Viewer Image (SV). RAW images are preferred. A SV image is basically an image shot. It should be used if you further adjust the image post-acquisition and/or need to add annotations (like a scale bar) on the exported images.
Overlay image can only be exported as Scaled Viewer Image.
Acquiring a Z-stack
1. Z-range setup: start Fast Live, adjust Z position to find both ends of the future Z-stack, and mark them as Begin and End separately. If you have acquired a Z-stack, clear the previous Z-range using the trash can icon before adding new Begin and End positions
2. Z-step size: System Optimized step size can always be used. But if you will only perform maximum intensity projection of the Z-stack, you can enter the thickness of the Optical Section as the Z-Step Size. It is larger than the system suggested, but doing so saves time in acquisition and reduce photobleaching.
3. Stack Direction: bottom to top direction is preferred.
4. Click Start to collect the Z-stacks.
5. You may use the 3D Viewer in LAS X to view the Z-stack.
Acquiring Image Tiles from a Tissue Section
1. If you have a multiple-channel acquisition, you may activate only one channel the tile-scanning setup step. That saves time and reduces photobleaching.
2. Launch Navigator
3. Start Spiral: the system starts scanning and generates an overview of the specimen around the initial sample position. You may Stop the spiral action at any time.
Use the mouse wheel to zoom-in or zoom-out the overview image, or pan the image by holding down the left mouse button.
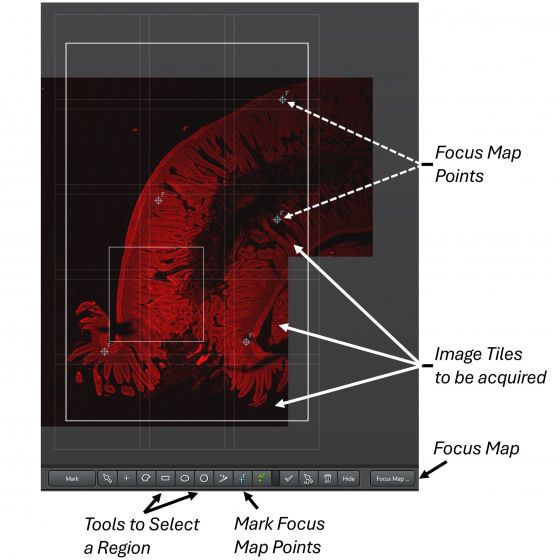
4. Use a drawing tool (for example: the rectangle tool) to draw a region on the overview image. White-lined image tiles show and superimpose on the overview image. There are 10% overlaps between the tiles by default and that works for most situations.
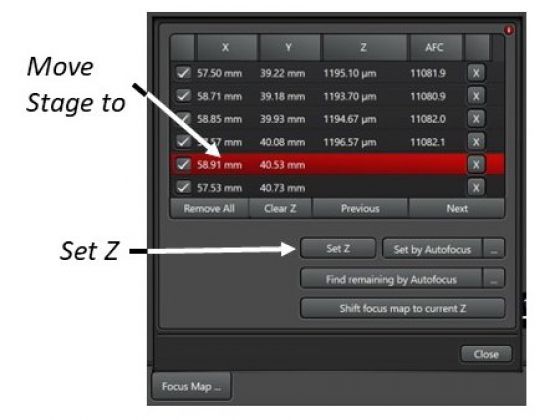
5. Set Focus Map Points: The points help counteract undulating surface of a large specimen. Manually add points along the borders of the specimen. At least 4 points are needed at the corners of the specimen. More points can be added in-between in a regular manner for better result.
6. Open Focus Map …, click on one point in the list that moves the stage to the position, start Fast Live, find the best focus, and Set Z to let the system remember the focus. Repeat for all points.
7. Click Start to capture the image tiles. If you have multiple channels in the initial setup, please make sure you have all channels selected before capturing the images.
8. When image acquisition is completed, two image files show in project: one contains individual tiles before stitching; the other one is a single image of tiles that are already stitched together.
Fluorescence Lifetime-Based Acquisition

The Stellaris 8’s high frequency pulsed laser (White Light Laser) in conjunction with photon-counting ability of all detectors allows the system to perform fluorescence lifetime-based separation of fluorescent species, which conveniently complement the regular spectrum-based confocal imaging. By this way, fluorescent species with overlapped spectra in the same sample may potentially be separated based on their different fluorescence lifetime information.
1. Select the fluorescent channel, under TauModes, select TauGating for collection of photons that arrive during a period of time or TauSeparation for collection of photons that arrive at a certain time point.

TauGating:
(1). Open the fluorescence lifetime setup window.
(2). Add channel(s).
(3). Double-click the band and set a range of fluorescence lifetime for this channel
(4). Start Fast Live to observe the separation of the fluorescent species. This is a trial-and-error process if the information about the fluorescence lifetime of the species is not available.
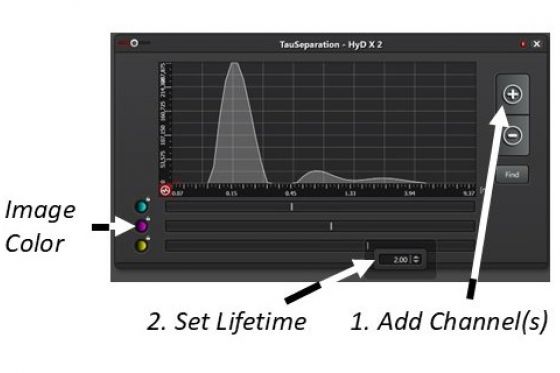
TauSeparation:
(1). Open the fluorescence lifetime setup window
(2). Add channel(s)
(3). Double-click the bar and enter a fluorescence lifetime for the channel
(4). Start Fast Live to observe the separation of the fluorescent species. Again, this is a trial-and-error process if the information about the fluorescence lifetime of the species is not available.
2. Final acquisition of images by Capture Image for single image acquisition or Start if serial acquisition is set up for the experiment
1. Take your specimen with you, drop the objective lens to the lowest position, dab off the immersion medium on the lens with lens paper (doing it very gently) if an immersion objective lens has been used.
2. Check the online booking calendar.
3. Based on what you see on the calendar:
(A) If another user comes to use the microscope in the next 2 hours, close the program, keep the system on.
(B) If nobody uses the microscope in the next 2 hours, close the program, turn off the power for the lasers (switch #3) and the main power of the system (switch #2), shut down the computer from the ‘Start’ menu.
(4) Lock the door when you leave the room.